|
|
Post by dodger on Dec 30, 2017 19:40:45 GMT
Hi foxy, I currently have the standard open diff but it’s in the list to swap out for an LSD at some point. I have done quite a few track days and auto solo with the car now and while it’s not perfect having an open diff it’s not that bad. I did have a racing beat 4/1 manifold and the full exhaust system prior to going the turbo route. The manifold is now sat under my work bench and they really are a nice bit of kit. I agree with the programmable ECU making a difference. I have run it NA for a year while getting to grips with the MIETE and understanding how set up and tune the starting and idle. I started with a base map and have tuned from there. I had a remote tune from vally5s which got me going in the right direction and was well worth it. I’m not far away from my first attempt at starting and running with the turbo fitted. I’ll need to do some basic retuning with the turbo fitted before my MOT at the start of February. After that I really need to get it on the dyno for a full tune. At the moment I’m still running the standard clutch so am limiting it to wastgate pressure only. Good luck with you turbo project sounds we are doing similar things
|
|
foxy
New Here

Posts: 26 
|
Post by foxy on Dec 30, 2017 23:25:39 GMT
Interesting to hear, thanks. I had an LSD in my 1.6 NA and really miss it, I suppose it's about being in more in control of what the car's doing.
|
|
|
|
Post by dodger on Dec 31, 2017 8:12:22 GMT
I’ve never had an LSD so probably don’t know what I’m missing out on.
|
|
|
|
Post by dodger on Dec 31, 2017 15:23:41 GMT
Little bit more done today. Completed my lower rad hose re- routing using the existing hoses which I cut down slightly and a 90 degree alloy pipe. I’m happy with how it turned it but after a few emails with Revent I could have used the existing hard pipe if I’d clocked the turbo slightly further. I thought about taking it off and clocking it further but settled on the routing I have for now.
One I have needed to do for a while, even before going turbo, was fix my oil pressure gauge sender. To move it away from the engin vibration which wrecked the sender I have fitted a 500mm oil line from th sand-which plate to a sensor mounted on the inner wing. I just need to wirebh gauge back into the air vent in the cabin now. Last job today was to fill the engine with oil again. I need to get some antifreeze and sort that out then I’m good to go with the first start.
|
|
|
|
Post by dodger on Jan 11, 2018 22:42:08 GMT
Last weekend was a big day for me as there were no more jobs on my to do list other then 'start car'. I checked everything I had done to the car during the fitting of the turbo, then checked it all again............then just to be sure checked it once more. The only thing I found that gave me problems was the original bracket that attaches to the gearbox and then to the downpipe. I forgot to remove this and now with the turbo downpipe in place I can't get it off as there is not enough room to apply enough force to undo the upper bolt. The downpipe is hard up against this now redundant bracket so I can't fit the actual bracket that came in the Recent kit. It's a minor problem and one I can live with until later. I did waste a couple of hours trying to get it off though which was a pain. So, back to starting the car. I had checked over my ME221 calibration file a few times, although I don't really know why as nothing should have changed. The plan was to get it started and let it idle and warm-up to check for noises and leaks. The first turn of the key proved the battery was flat after three months so needed a quick charge up. Second turn of the key and the car started perfectly and went into it warn up cycle with no horrible noises (apart from the tappets which stopped once filled with oil). A good look over the engine bay showed no sign of oil, water or gasket leaks so I let it continue to warm up, keeping an eye on all the ECU vital signs. After it reached about 80 degrees and I kept it going to keep topping off the coolant level while the air was expelled from the system. Once that was sorted I turned to off and had another good look and feel for any leaks. The fact I didn't find any was a surprise and I was pretty relieved. This could well changes once it's been out for a proper run but it's a good point to start from. Biggest issue I had was the stack oil pressure gauge not working but o think this requires the sensor grounding now its remotely mounted. It shook ground through threads but as it connected to Flexi oil line now I suspect tits not happening. I need to make a better mount for this as it is on bent P Clip for now as I couldn't find anything else to hand at the time. To say I'm happy with the results so far is an understatement! I now need to get it out in the road and carry out some tuning around the idle and fats idle in preparation for the MOT in a few week. It will also mean the yearly saga of swapping over a few parts the MOT man doesn't like much since I've been told they would result in a fail. One last thing I did was modify the main under tray to fit around the intercooler pipes. To be honest I didn't take as much time with this as I could have so took a little bit more material out than required but its still a good fit. I just wanted to get it finished. All I need to now is put the bumper back on and modify the small under tray type thing that normally joins the bumper to the main under tray and its ready for its first road test. A few pictures of the finished engine bay 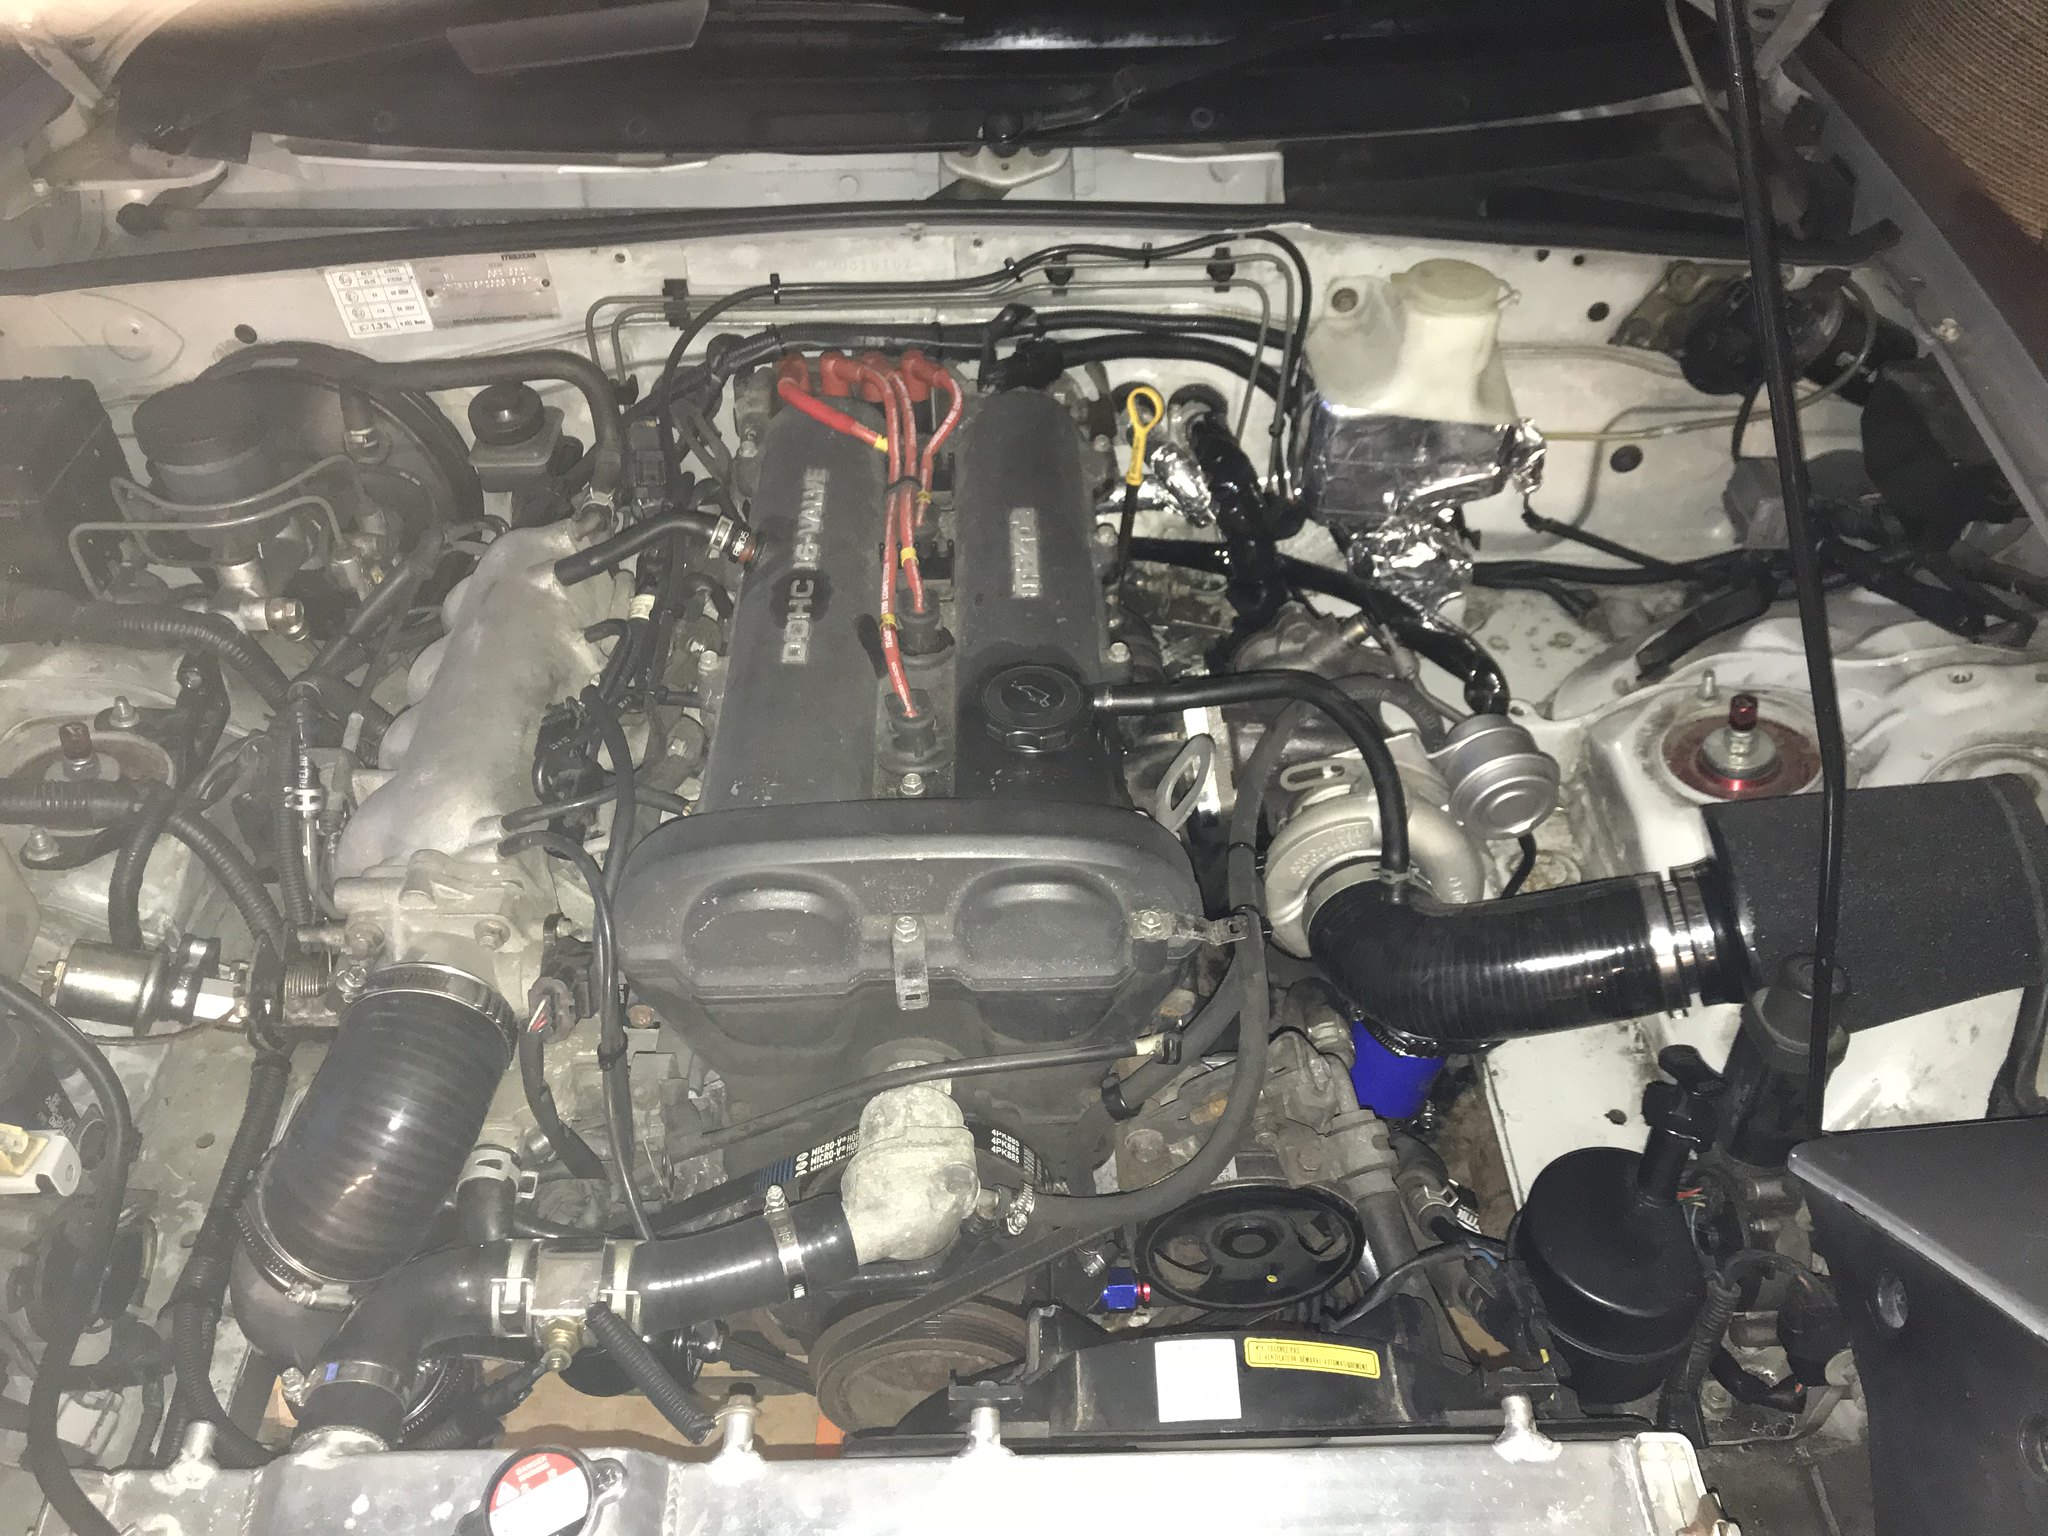 Untitled Untitled by
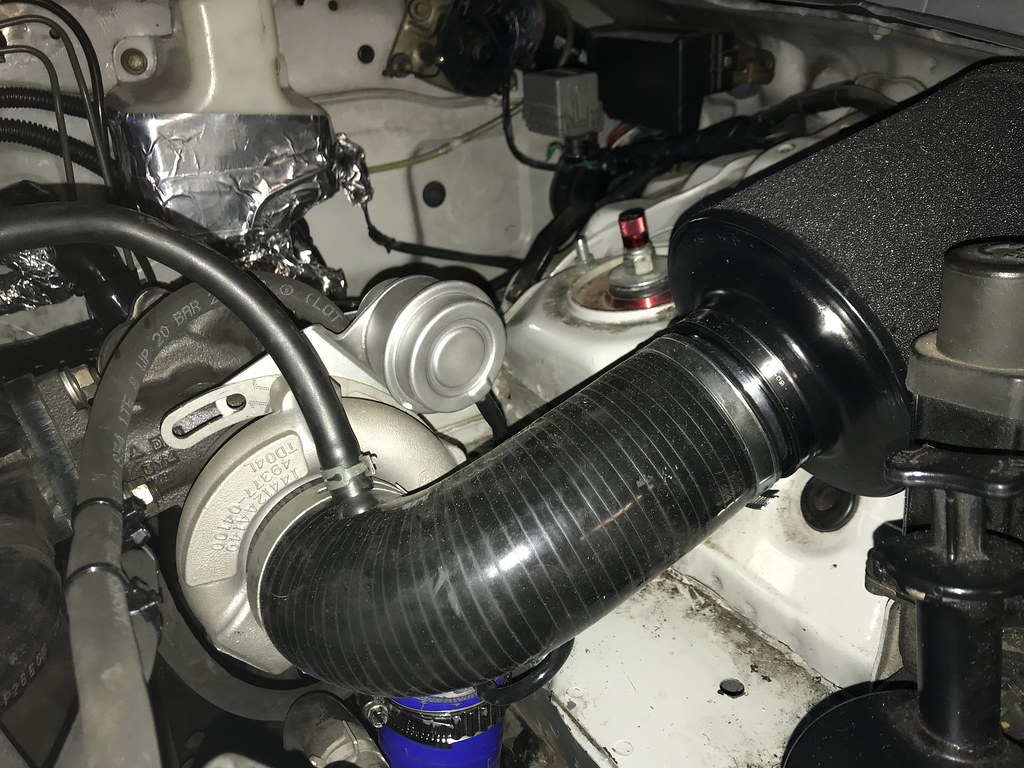 by
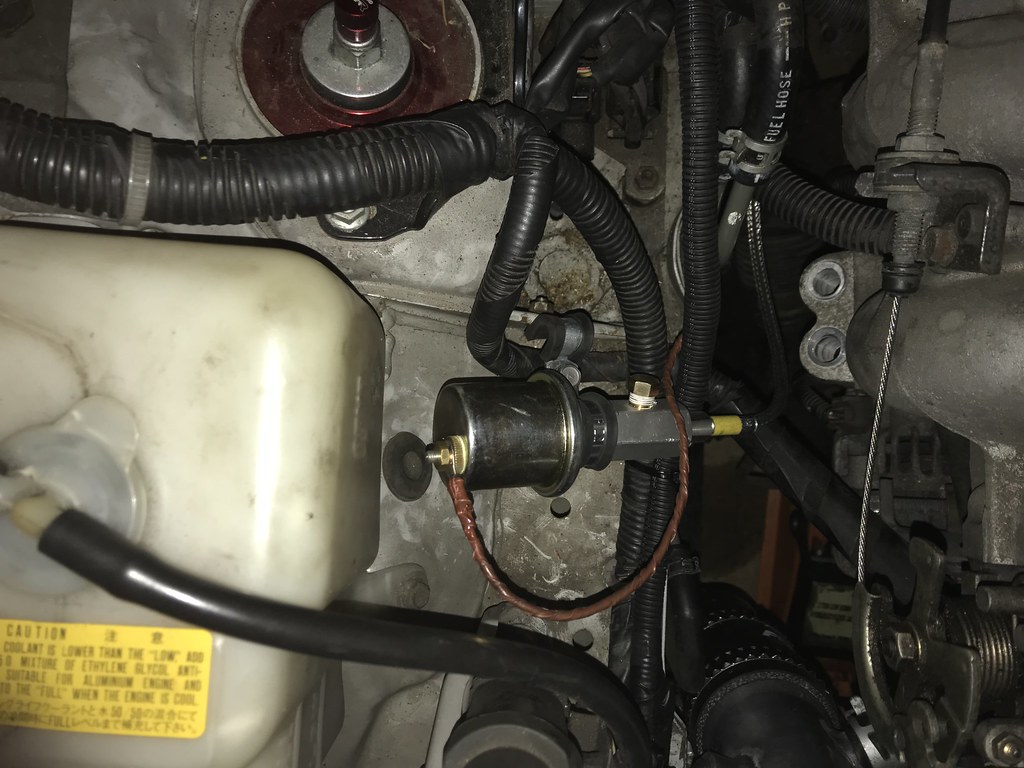 Untitled Untitled by
|
|
|
|
Post by dodger on Feb 18, 2018 19:43:08 GMT
While everything was fine at idle in the garage a more spirited drive on the roads turned up a slight from the right hand heater hose in the pic below. This has always leaked a little but not really enough to work about. Now it was full on drip, drip, drip so I had to do something about it. 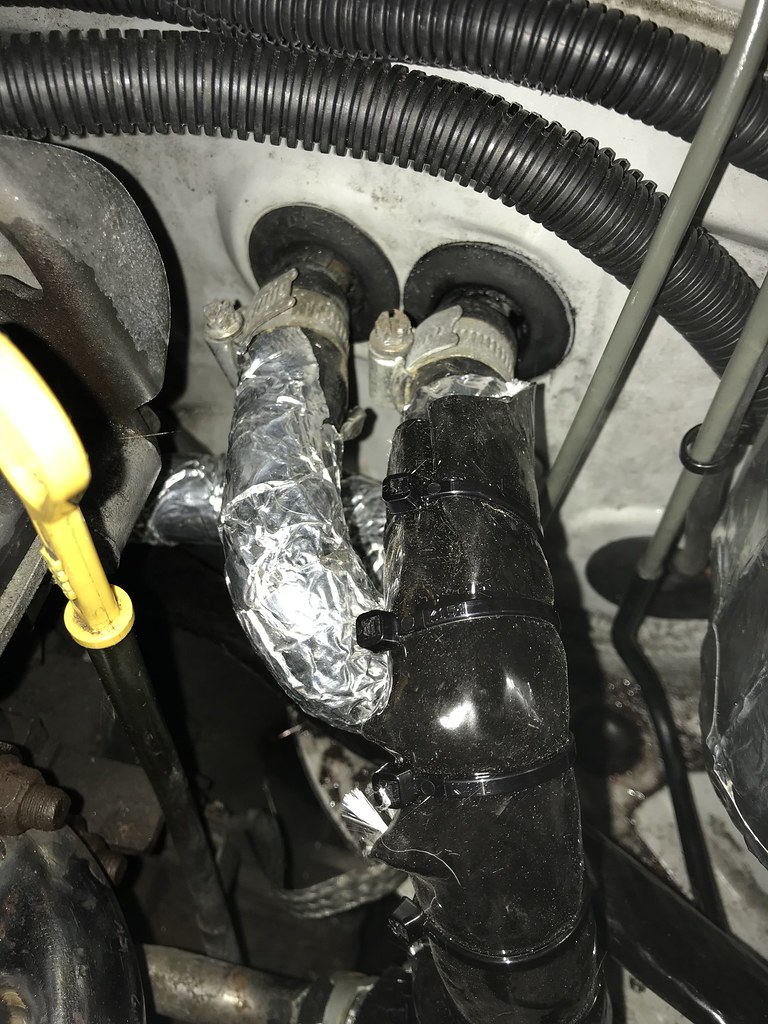 Untitled Untitled by
I drained the fluid and removed the hose and took a 1/4 in 10mm socket to push into the pipe and make the pipe round again. As these pipes are only thin copper it had become crushed over the years so it was easy to push it back into shape. With that done reconnected the hose and filled with fluid again. I also noticed a small amount of fluid on the under tray but couldn't work out where it was coming from so was hoping it was just residue from filling the radiator. All this was not to be the case. After another first drive to see if the hose had stopped leaking, which it had, I saw even more fluid dripping from the under tray. So I got the car on jack stands and removed the under tray for a better look. Straight away I could see a drip from the crank pulley which meant the water pump had gone according to google. Having seen what a big doc this was It's not something I was looking forward to.
So once again the fluid was drained, radiator removed and the front of the engine stripped down. A really good You Tube video on how to do the water pump and cam belt was from 'Car Passion Channel' so watching this a few times certainly made the whole process a lot simpler. The first thing I did was crack the water pump bolts while the belts were attached to provide a bit of tension and something to turn against. After that it was a case of removing the belts and front engine covers along with the can cover. I then timed the cams and locked them in place and removed the cam wheels. I was very carful to label and layout all the parts removed to help when it was time to reassemble.
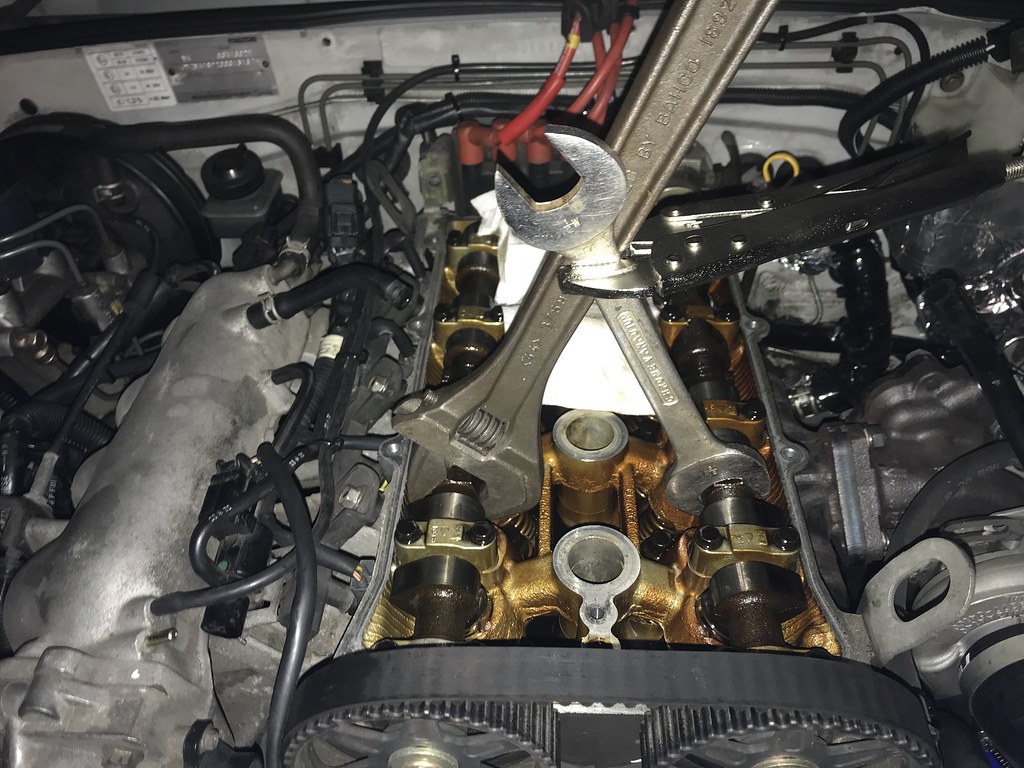 Untitled Untitled by
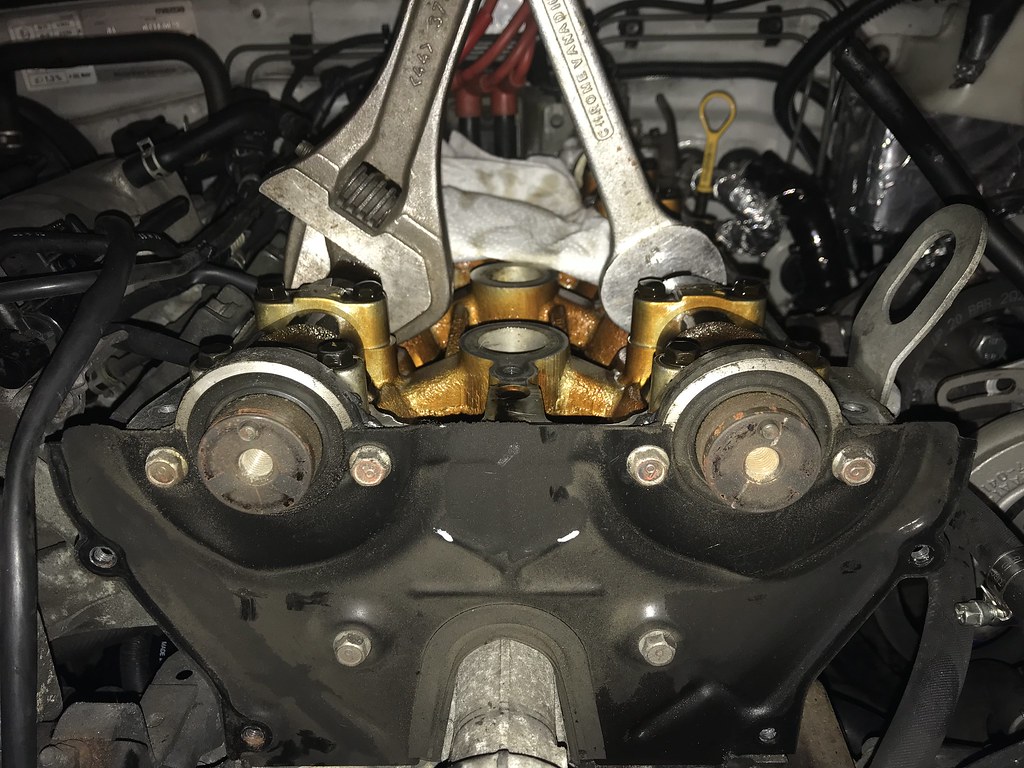 Untitled Untitled by
I really wasn't looking forwards to removing the crank pull or crank bolt as I'd read some horror stories on the web about them big really seized solid. I used lots and lots of penetrant spray on the 4 pulley bolts and all around the crank pulley. The bolt came out ok but the pulley was solid and nothing I did would move it so I left it alone and had another go the next day. With the help of crow bar I managed to start it moving and after bit of cursing and swearing it came free. The next thing that could go easy or very badly was the crank bolt.
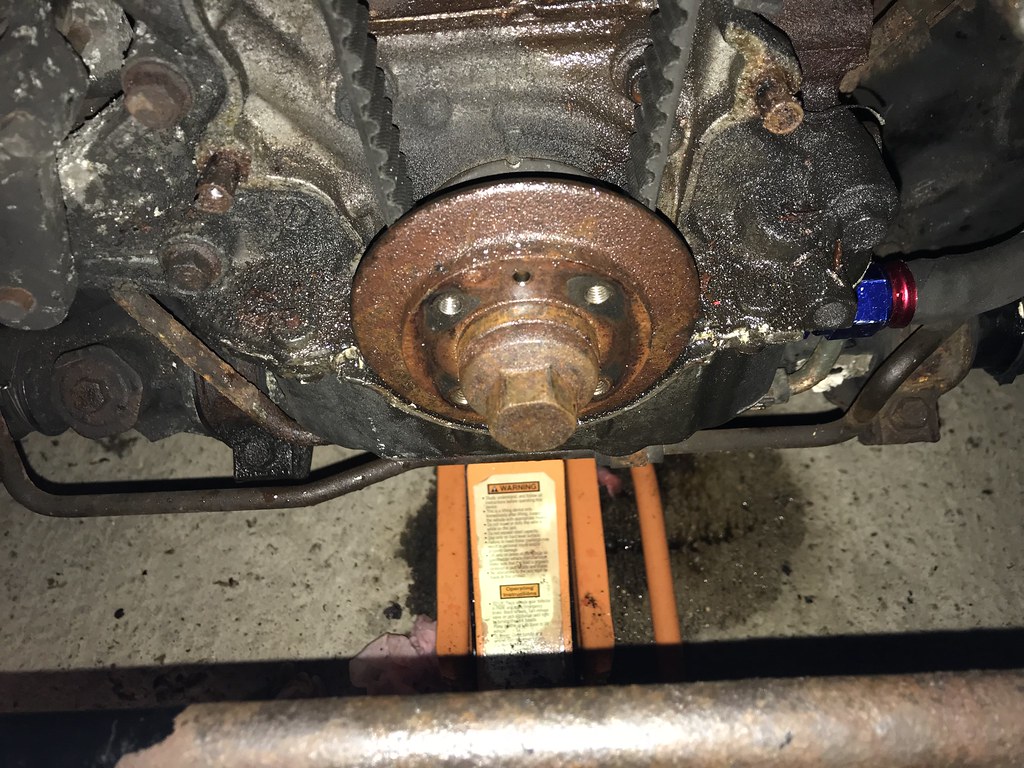 Untitled Untitled by
I had bought a 6 sided socket to make sure I had a very good fit on the bolt. put it in 5th and the hand break on really hard and gave it a go with my big breaker bar. The bolt didn't move at all as I just couldn't get enough purchase with the breaker bar. I looked around and found an axle stand that could slip over the breaker bar and add some extra length. I tired again and this time I felt a slight movement and heard a satisfying 'crack' from the bolt. With the bolt removed a took the cam belt off and removed the water pump.
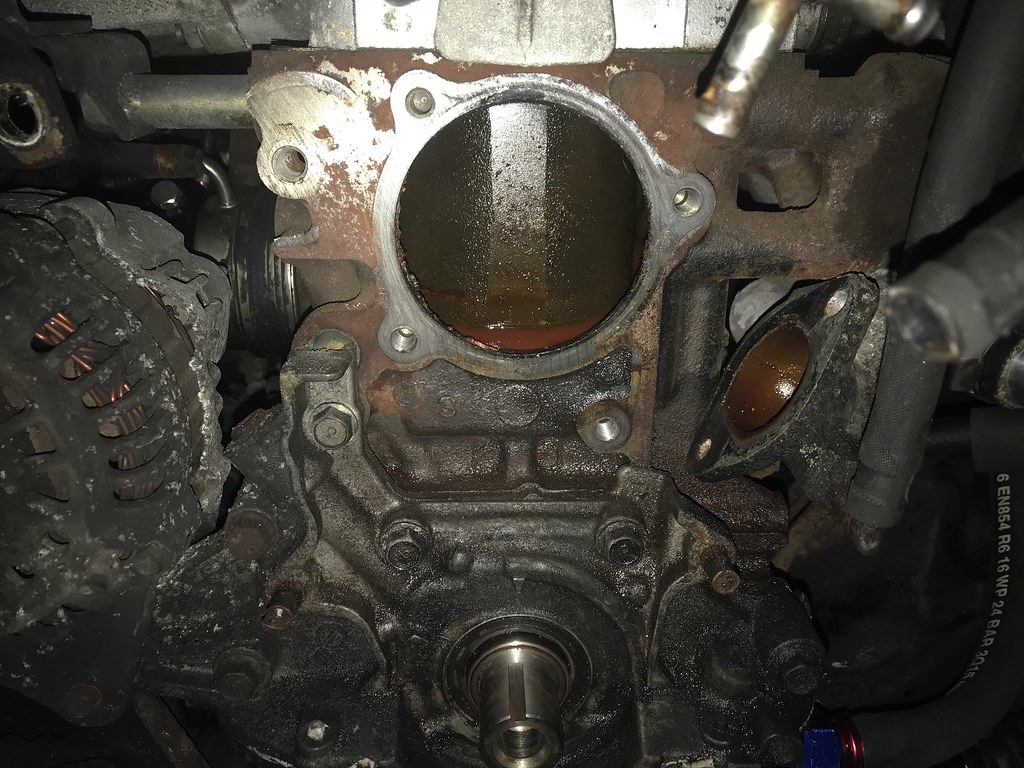 Untitled Untitled by
After all the surfaces were cleaned I replaced the little O-ring seal that goes between the heater pipe and the water outlet housing, replaced the housing gasket and refitted the water pump. To make fitting the pump easier I removed the thermostat housing.
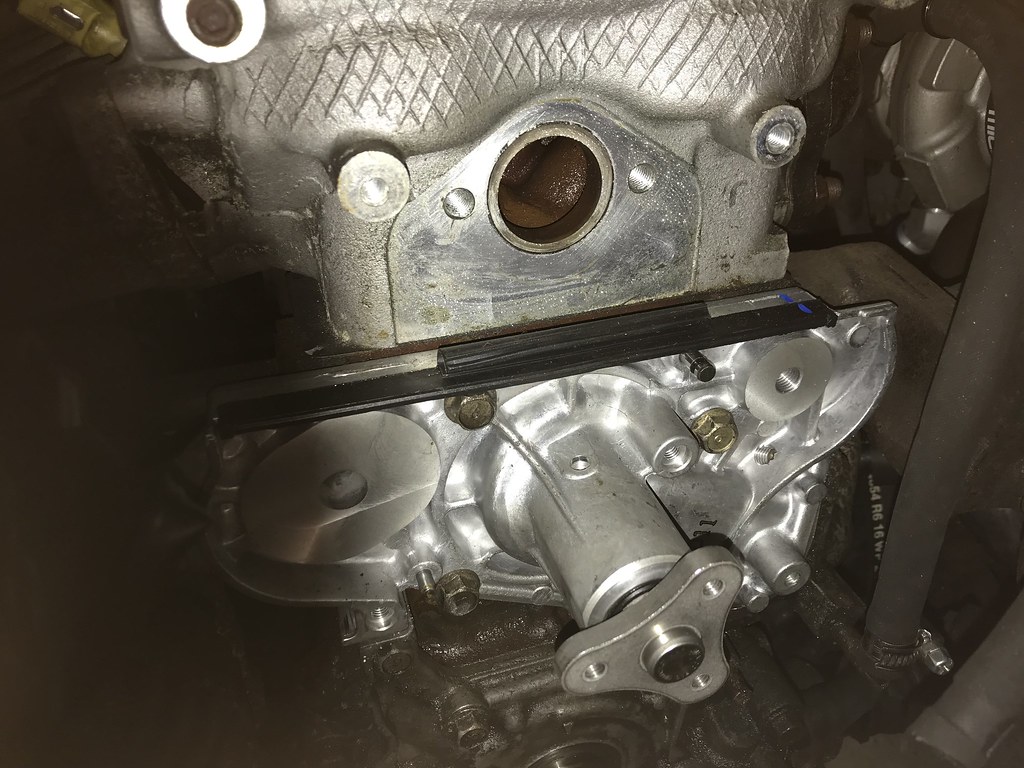 Untitled Untitled by roger clarke, on Flickr From there it was case of timing everything back up and fitting new cam belt (I timed it up using the method from Car Passion Channel and it seemed to work well). After checking it was timed correctly about 10 times I then refitted the engine covers, cam cover, belts, radiator and fluid. Time to start the engine! Very nervous as I turned the key but it started straight away with no funny noises. As it warmed up and I checked for leaks I saw a really bad one from the bottom of the outlet housing.  |
|
|
|
Post by dodger on Feb 18, 2018 22:16:49 GMT
The housing had been a real pain to refit as it was hard to align the bolt holes, insert the bolts all while pushing the housing into the heater pipes to trap the o-ring. I had used OEM gaskets but I had clearly got something wrong so drained all the fluid again and removed the housing bolts and pulled the gasket free. My plan was to use a bead of silicone on each side of the gasket (the same silicon I use on the cam cover) and see how that worked. It was impossible to align the housing bolt holes with the water pump as the heater hard pipe was preventing me from pushing it into place fully. To resolve this I undid the nut on the manifold and slid the heater hard pipe out the way. With this out the way I could insert the bolts loosely and then reinsert the o-ring seal and heater pipe and bolt it all up again. After this it was time to refill with fluid (again) and let the silicone dry a little. One coffee later I started the car again and let it warm up, thankfully the silicone had done it's job and the leak had stopped. The water pump leak had also stopped so I was a very happy chap! After a few days road tuning it was time for the MOT and haply;iy it passed ok. I was concerned about emissions and the fast idle test was very close indeed but managed to just seal under the limit.
For now that's it with the car as really jus than to drive it now. I'm so glad I took the plunge and did the turbo although at times i did wonder if I was taking a perfectly good car and breaking it. The ECU need more fine tuning but I'll leave that for a rolling road as it drives really well at the moment. Maybe a bit more tuning around hot start/idle is required as this can be a little temperamental at times but if that's all thats needed after everything that's been done to the car I'll take it.
|
|
|
|
Post by scottydugg on Feb 19, 2018 8:46:54 GMT
Glad to see you finally cracked it  Car Passion channel is a great source of information. I'll be doing the exact same as you in the next few weeks. |
|
|
|
Post by dodger on Feb 19, 2018 20:55:36 GMT
Cheers Scottydugg. I’m finding boost to be quite addictive.
|
|
|
|
Post by trikkisixx on Feb 20, 2018 12:09:50 GMT
Just read through this, great progress and a proper tidy install! Did you find have the issue with the fuel pump/immobiliser wiring for the ECU? I got everything done on mine and then this stumped me!
|
|
|
|
Post by dodger on Feb 20, 2018 22:29:36 GMT
Hi trikkisixx, Thanks for the complements on the install. I wanted to aim for as close to an OEM look as possible. I had few headaches with the fuel pump priming when I first installed the ME221 as I could not work out which wires to swap as the UK 97 cars seem to have different wiring to all other MX5. I had wires in both pin 1U and 1V. In the Me221 manual it shows 1V is unpopulated and you simply swap 1U into 1V to Mal eat fuel pump work. In the end swapping these two wires around worked and the pump primed.
|
|
|
|
Post by trikkisixx on Feb 21, 2018 13:25:05 GMT
No worries man, it looks really good!
I swear I tried swapping those wires but I guess I did the wrong ones, god knows! Gonna give it another bash this weekend and see what happens.
Will be keeping an eye on your thread, looking forward to seeing progress!
|
|