|
|
Post by Bilbo on Jun 1, 2023 23:47:23 GMT
Cheers mate, that's useful. I'll get the multimeter out to check the TPS, should be ok with a little testing. |
|
|
|
Post by Bilbo on Jun 4, 2023 0:57:09 GMT
So I got started on the throttle bodies last night. Firstly the secondary butterflies had to come out as they're not needed:  The tiny screws holding them to the spindle were a total pain and had to be drilled out. As a result the spindle then wouldn't slide out in one piece afterwards, so I cut, bent, chopped, and pulled the spindle out bit by bit, was a bit of a ballache to be honest: 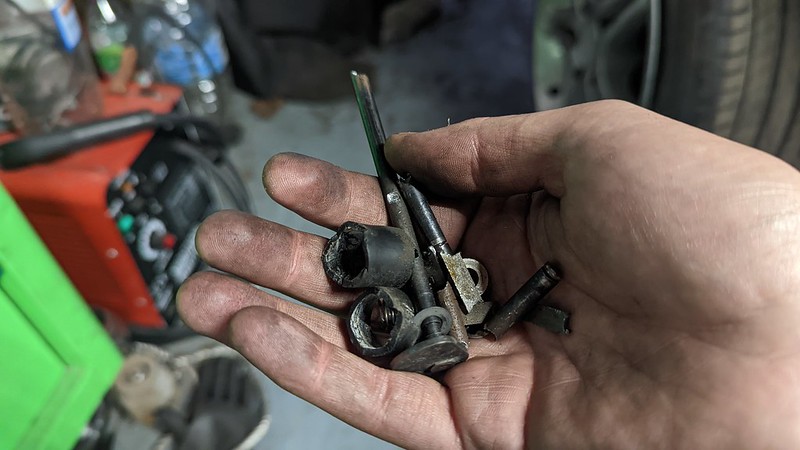 Unscrewed the fuel rail and removed the injectors. Cleaned everything up and cracked out the good old JB Weld to fill the injector holes. Smoothed the JB Weld out on the inside so it follows the shape of the ports. Also filled all of the holes left from the secondary spindle that I removed. This is the exact same process I did on the MX-5 and that setup was still running reliably over 3 years later, so I'm happy with this being a permanent solution. 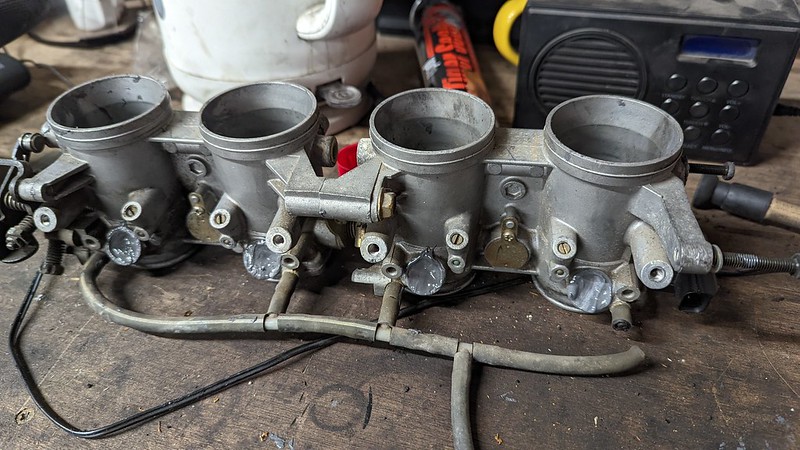 Now, onto making the intake manifold itself. This took a lot of thinking and working out exactly how I wanted everything. The VVT MX-5 cylinder head has the intake face angled down slightly. I wanted these throttle bodies angled up by about 20 degrees, so I had to got a bit further than that to compensate for the head angle. Anyway, as I mentioned before, the port spacing on the intake flange is 91-91-91mm, and the GSXR bodies are 75-80-75. Given that I wanted them angled up, and also the runners needed to be angled to change the port spacing to suit the throttle bodies, I wanted to jig the flange and the throttle bodies so we had a fixed position to work with. Luckily my mate was at the workshop today who has a ton of experience with all sorts of motorsport fabrication, so he gave a few pointers on making a basic jig. Now it's hardly the most professional looking setup you've ever seen, but if it works it works. 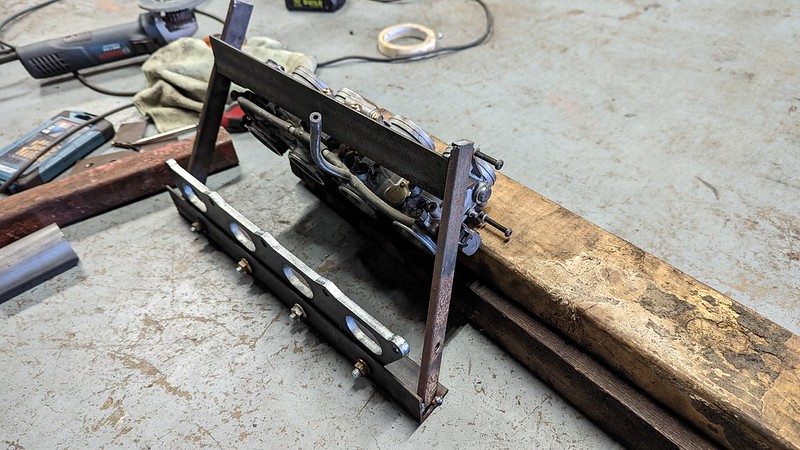 Drilled out some angle iron and got both parts bolted to it. Then got them set in the exact position we needed, and while I held it still my mate welded the side pieces on, to hold it all firmly in place. As a stroke of luck, the threads in the casting that held the GSXR fuel rail on sat at about a 30 degree angle, so after bolting the angle iron on to them, we set the angle iron perfectly flat and the throttle bodies were sat at the exact angle I was looking for. 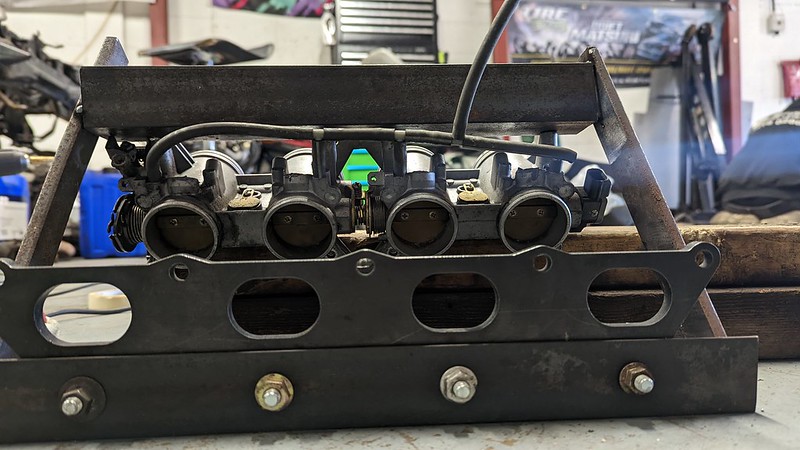 I bought a load of bits to get these built and finished, one of them being 1m of 45mm 2mm wall steel pipe. I did some rough calculations and worked out that this pipe size when ovaled out in the vice should roughly match the 50x30mm port size on the flange. It sort of does, but more on that in a minute. I started cutting the pipe to test fit. The 2 centre ports needed to be moved in by 5.5mm each. It took a little bit of working out.  Not a bad initial try. So I got the 2 centre runners made up first. Used a triangle calculator online because despite an A in GCSE Maths, that was now 14 years ago, and it all seemed like too much work. Anyway, to get a 30 degree angle on this size of pipe I needed to mark 25mm in on one side, and then cut the pipe from that mark, tapering down to the original straight end on the other side of the pipe. Worked pretty well. I got both made up and tacked on:  Not bad going so far. Now the outer ports needed more angle put into them. With the centres being 5.5mm further in, and the 1-2 difference being 11mm, I needed to bring these runners in by 16.5mm. So we did a bit more measuring, and after one failed attempt I managed to make the correct cut,and got the outer runners made up. 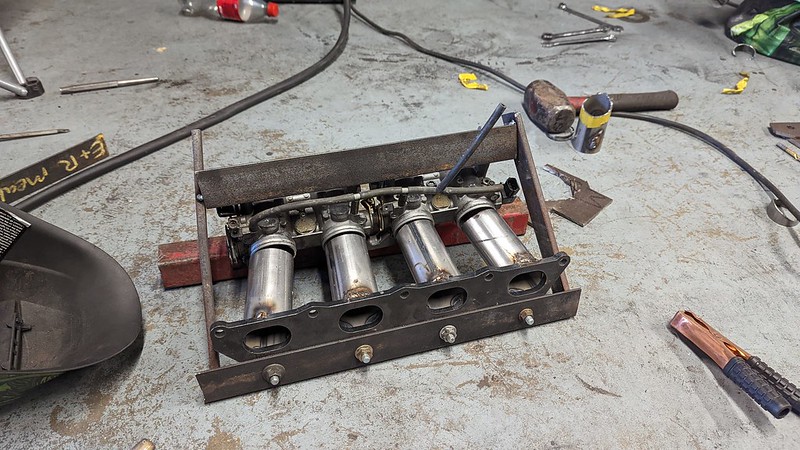 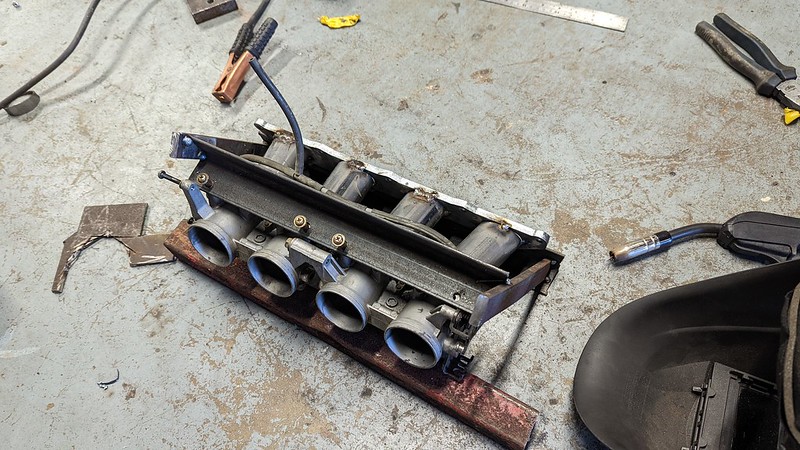 Now these are going to be connected with silicone joiners. The pipe internal diameter and the throttle body internal diameter matches nicely, but as you can see the outer runners are at a bit of a different angle. The main point of this jig was to get the upward angle and port spacing sorted. Now I can add a small amount of additional bend to the ends of each runner to get them sitting perfectly straight to the throttle bodies. Currently this setup is exactly 17cm long from flange face to the inlet of the throttle bodies, A standard intake manifold on the 5 engine is approximately 20cm, so I still have some room to work with and not take up any additional room in the bay (obviously trumpets will add length, but we'll work that out later). The ovaled ends I made on each runner in the vice worked pretty well. Width wise they are bang on 50mm and match the intake flange. Height wise they are a couple of mm larger, so once the manifold is fully welded up, I am going to die grind the intake flange on the runner side, to taper the size out to the runners a bit better. It's not the most perfect setup ever, but there should at least be no major air flow disruptions when it is done, which is what I'm hoping for. As I got the GSXR bodies for free, this setup including all the pipe, joiners, jubilees, JB Weld, and intake flange has cost me under £100. The most expensive part will be the trumpets, but even then this is a massive saving over any off the shelf setup you can buy anywhere, and once again it's been great to learn some new stuff as I go. Hoping to have these done and on the car next weekend all being well! |
|
|
|
Post by Bilbo on Jun 5, 2023 23:50:28 GMT
Been busy. Went away with the girlfriend for my belated birthday present. Nice hotel, pool, managed about 3 minutes in the steam room before I felt I was going to die 😂 There was a big old Jag in the car park  anyway, enough pampering myself, had to get back on the ITBs. My mate has a spare VVT engine lying around on the engine stand, which was ideal. I mounted up the bodies and I'm pretty happy with the angle they sit at (note, silicone joiners are too long in these photos, it was just a basic test fit).  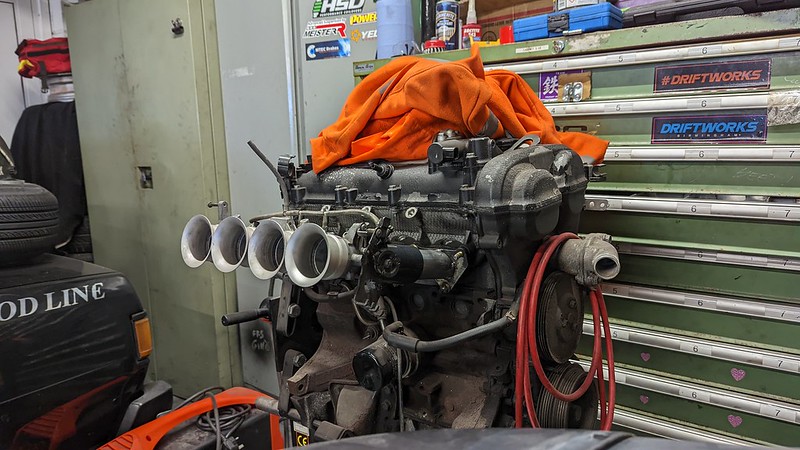 With the downward angle of the mounting face on the head, these are sitting right about where I had imagined they would angle wise. Due to the absolute ballache of a job getting the intake manifold off of my engine in the car is going to be due to brake master/booster location, absolutely zero fitting to the actual application has occurred. I am simply winging the entire thing haha, these are getting finished as they are, if anything is in the way, it is getting moved, removed, or bent out of the way. Anyway I bolted all 9 nuts down to the head, and welded it up. Not my prettiest welding ever, had to go over a couple of bits, but I think it's come out alright. Flange appears to have survived just fine, straight edge still sits nice and straight on the mounting side, so no warping has occurred from what I can tell. I think bolting it to the head worked well and seemed to take a fair bit of heat away from the flange as it was being welded. As these are steel and I have MIG welded them on, to prevent corrosion I have slapped a fair amount of sealer over the welds themselves. The sealer isn't particularly pretty, but none of the welds are exposed at all, so it'll do the job. I'm not in this for #weldporn or internet clout so I don't really give much of a sh*t how it looks, as long as it works as intended.  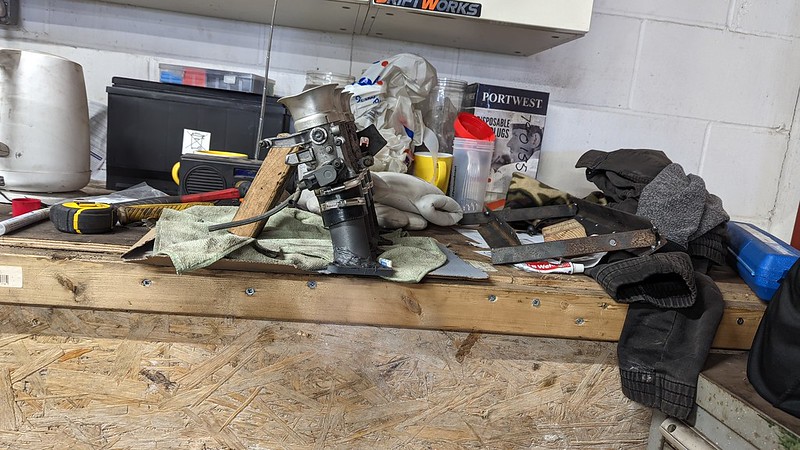 The trumpets here are the original ones I had on my mk1 5 before I swapped to the big 90mm ones. They're off an older GSXR 1100, carbed model. They have slots you can tighten a clamp over to press them tighter. I thought I'd offer them up as I've already got them lying around, and with a little tap they slid straight on the inlet ports perfectly, in fact they're tight enough sans clamp that you can literally pick the entire setup up just by the trumpets, so they'll do for an initial setup until I work out some better ones to buy. Port match wise they're about 1 or 2mm too big judging from this photo, but good enough as a temporary measure for sure: 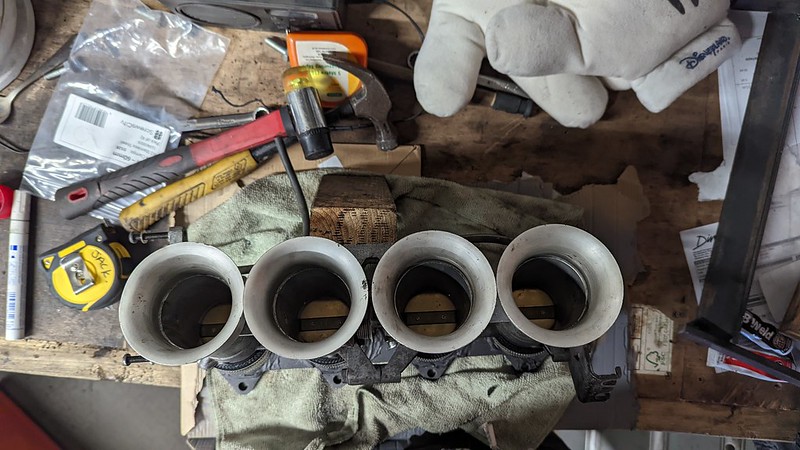 I really liked the 90mm trumpets on my mk1 5 setup, so I'll likely end up doing something similar on this. Doing some vague measurements with the original intake manifold in situ on the Vauxhall, I may need to relocate my brake fluid reservoir, but I think with some gentle brake pipe bending, the upwards angle I have made should just about clear the brake master cylinder, and the booster is essentially out of the way I think as cylinder 4 should sit further forward than it anyway. Just the reservoir will be the challenge, I'll work that out somehow. One question, brake fluid reservoir, does it need to be above the master if I relocate it? I'm sure can make that work, but wasn't sure if it was important that it could gravity feed to the master cylinder or not? Or will the master cylinder simply suck in the fluid it needs regardless? |
|
|
|
Post by dadbif on Jun 6, 2023 7:42:25 GMT
“One question, brake fluid reservoir, does it need to be above the master if I relocate it? I'm sure can make that work, but wasn't sure if it was important that it could gravity feed to the master cylinder or not? Or will the master cylinder simply suck in the fluid it needs regardless?”
You need gravity.
|
|
|
|
Post by boggissimo on Jun 6, 2023 11:22:35 GMT
Are the Mickey Mouse hands your welding gauntlets?  |
|
|
|
Post by Bilbo on Jun 6, 2023 16:30:18 GMT
“One question, brake fluid reservoir, does it need to be above the master if I relocate it? I'm sure can make that work, but wasn't sure if it was important that it could gravity feed to the master cylinder or not? Or will the master cylinder simply suck in the fluid it needs regardless?” You need gravity. Cheers. Did some more reading today and yeah, going to mount it up above the master cylinder. I've ordered connectors and hose now so will get this done soon. Are the Mickey Mouse hands your welding gauntlets?  Hahaha, they just appeared one day, my mate said he found them. No idea where. Very strange haha. |
|
|
|
Post by Zed. on Jun 6, 2023 18:45:15 GMT
“One question, brake fluid reservoir, does it need to be above the master if I relocate it? I'm sure can make that work, but wasn't sure if it was important that it could gravity feed to the master cylinder or not? Or will the master cylinder simply suck in the fluid it needs regardless?” You need gravity. well, sorta need gravity but will also syphon once the reservoir to m/cylinder pipes are 'bled'  Rich. |
|
|
|
Post by Zed. on Jun 6, 2023 18:47:51 GMT
Are the Mickey Mouse hands your welding gauntlets?  OR  Rich. |
|
|
|
Post by Bilbo on Jun 13, 2023 0:18:00 GMT
Right, so Friday afternoon I went to the workshop, and started fitting the ITBs. I had made no alternative plans on getting home, I was driving home. So there was my motivation to complete the job properly in 1 day haha. Started by removing the intake manifold. This is always a pain in the a*se, but got it sorted eventually:  With this off I cleaned up the mating faces, fitted a new gasket, and got the throttle bodies bolted on. 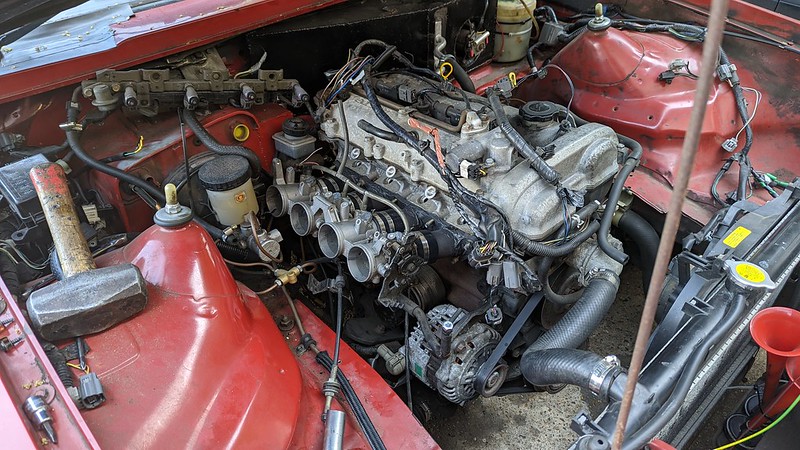 Please ignore the also partially fitted air horns haha, that's a job I was finishing at the same time. Anyway yeah so they fit, the flange didn't warp when welding them up, and they bolted on nicely. So one very obvious issue here, the brake master cylinder haha. Not the end of the world, I am making up a plate and deleting the booster tomorrow night, will give me tons more room. So bar the clearance for trumpets of anything more than 20mm everything looked good. I then got the vacuum block mounted into the bay, and ran all my vac lines, re-attached fuel rail and injectors etc. etc. 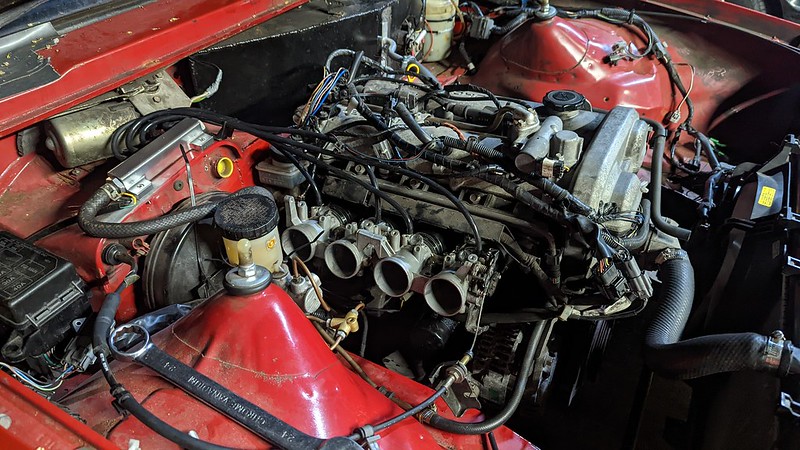 Need to tidy some wiring and stuff of course, which will all happen this week. Main thing was getting it in, making sure it ran and there were no vac leaks etc. Re-did the map on the ME221 to be TPS (Alpha-N) based, uploaded some basemap "ITB" VE and spark tables into my map, and fired it up. Started on the button, absolutely lovely, and idles great. Seeing around 50kPa on idle which is basically exactly what I had on my mk1 ITB setup on idle, so I'm pretty happy with the physical install. All seems well. TPS calibrated fine, and seemed fine, but when running I had a lot of TPS noise, like way too much. This map relies heavily on a decent consistent TPS reading, so yes I did manage to drive it home, but it wasn't ideal. So the last few days I've been messing with it on the drive. Tried applying a new ground to the TPS ground, getting a 5v from another source, everything I could. Nothing worked. The TPS is the problem, it's faulty. Bought a used genuine GSXR TPS but it won't be here for a few days, so I bought a cheap no-brand one on Amazon Prime just to try out, it was like £11 haha. Anyway obviously that was complete crap and literally gave no signal whatsoever, don't buy cheap sensors people haha. Anyway I still had a spare from my old Daytona 600 setup, and it just so happened to fit. It's on, it's calibrated, and it'll do until the proper GSXR one arrives later this week. Drove it tonight, slowly sorting out the VE table as it wasn't that good at first, taking time to smooth the table out, get rid of any lean and rich spikes etc. Still a long way to go, but it is driveable now. Both cold and hot start are both really really good to be honest, very pleased with that. Flat out is absolutely glorious, there is literally zero sound deadening between you and the engine bay in this car, so it is just pure ear melting ITB scream, it's absolutely amazing. When I'm a bit more happy with the map and don't have my laptop riding shotgun constantly I will get some videos of it. Oh yeah this also happened last night: 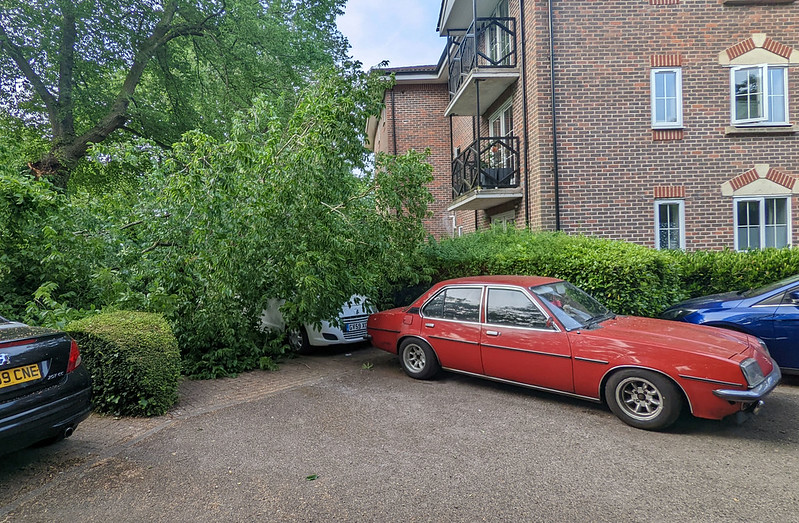 Doesn't look like much but that is an absolutely enormous branch/trunk of an old tree that came down. I'll fix the girlfriend's Alto, just a smashed rear screen and some nasty roof dents, but in all honesty I'm so glad it wasn't the Vauxhall, much harder to find spares like that for it haha. But anyway yeah absolute nightmare, it was so loud, I was sat in the living room having a tea at 1am and it sounded like upstairs balcony fell down, mad. Scary thing was I was stood under that tree barely an hour before having a cigarette haha, so I feel lucky considering. Vauxhall dodged a bullet there! Anyway, stuff left to do on the ITB setup: - Make up an ali plate to delete brake booster (with the lack of manifold vacuum now with ITBs compared to standard it isn't doing a great deal anyway) - Fit trumpets - Tidy/tuck and finish off wiring - Get the synchrometer out and check the balance of the throttle bodies. They run well but want to fine tune. - Fit genuine GSXR TPS when it arrives - Continue mapping it to run better All being well the car should be plenty ready for the run out to Goodwood for Players on Saturday. |
|
|
|
Post by boggissimo on Jun 13, 2023 8:01:21 GMT
That's a great result for a couple of nights' work! When you delete the booster are you just bolting the master cylinder to the plate on the firewall? Or will you need to move it further away and put a dogleg in the pedal actuator?
|
|
|
|
Post by Bilbo on Jun 13, 2023 10:13:25 GMT
That's a great result for a couple of nights' work! When you delete the booster are you just bolting the master cylinder to the plate on the firewall? Or will you need to move it further away and put a dogleg in the pedal actuator? Cheers, yeah not bad going. Master will be bolted directly to the plate yeah. Will be keeping the adjustable clevis on the pushrod, but may need to make up a custom length pushrod depending on the distance of the master to the pedal itself. Hoping I can re-drill the hole for the pushrod just marginally higher on the pedal to increase the pedal ratio, but we'll address that when it's bolted in. |
|
|
|
Post by scottydugg on Jun 13, 2023 12:07:51 GMT
Great progress and lucky about the tree, get a video up when it's dialled in - bet it sounds nuts from outside!
|
|
|
|
Post by wannabe on Jun 13, 2023 14:32:22 GMT
Awesome work as always  You might be able to claim off your flat/development management company's insurance for the tree damage, could be worth a look. |
|
|
|
Post by Bilbo on Jun 15, 2023 16:47:28 GMT
Great progress and lucky about the tree, get a video up when it's dialled in - bet it sounds nuts from outside! Yeah very lucky! I will get some soon, it does sound mad haha. Awesome work as always  You might be able to claim off your flat/development management company's insurance for the tree damage, could be worth a look. Cheers mate. Ah yeah we contacted managing agent, and they were like oh we'll speak to our insurance company. Their insurance straight up said nope, no way, she needs to claim off her car insurance. Don't think it's worth the grief even fighting it, I'll just buy a used bootlid off a breaker and sort it myself. Might try and invoice the managing agent, insurance or not I'd like to see them pay the costs of at least a used bootlid, even just as a goodwill gesture. But I highly doubt they will, scroungers. |
|
|
|
Post by Bilbo on Jun 15, 2023 16:49:05 GMT
Ok, so we've sorted a load of stuff re: the brakes. More to do, but it's been a lot of hours the last couple of days, not the most fun experience haha. So I started by removing the brake booster/servo from the car. Simple enough. Then made up a plate out of 5mm ali which bolts through the original 4 servo mounting holes, with 2 additional holes for the master cylinder to bolt on to. Offered up the master cylinder and it sat nicely. Actually with the thicker plate over the firewall a noticeable amount less flex on the brake master when being operated, which is good. Made up a pushrod pin to thread into the original brake pedal clevis, and got it all bolted down.  Lines are ugly but this was just to test it out to see if it would work. It did work, but my god it was terrible haha. Using an MX-5 brake pedal, so 4:1 pedal ratio, and as it turns out as this is a 2001-2005 MX-5 master cylinder, it is 1" bore. The pedal was so hard it was just disgusting to try and use. I drove home, and then back to the workshop and ripped it all off and started again. This time I opted for a 5/8" master cylinder. Less fluid displacement, but way way less pedal effort required. The brakes on this car aren't exactly massive, front calipers are small and the rears are only small drum cylinders, so the 5/8" master seems plenty to make them work as intended. So I made up another plate for the new master cylinder, and bolted it onto the firewall again. Working in driver's footwell in any car is never elegant, not a nice experience haha. Needed another pushrod made, but this time something a little slimmer to fit the master piston. So me and a mate modified this bolt, chopped the head off, cut it to size, and then clamped the threads in a drill. Ran the drill flat out and gently skimmed the non-threaded section up and down with a flap disc on the grinder. Basically like a makeshift lathe. Rounded the end off for a smoother contact patch when we were done. Worked a charm, looks good I reckon: 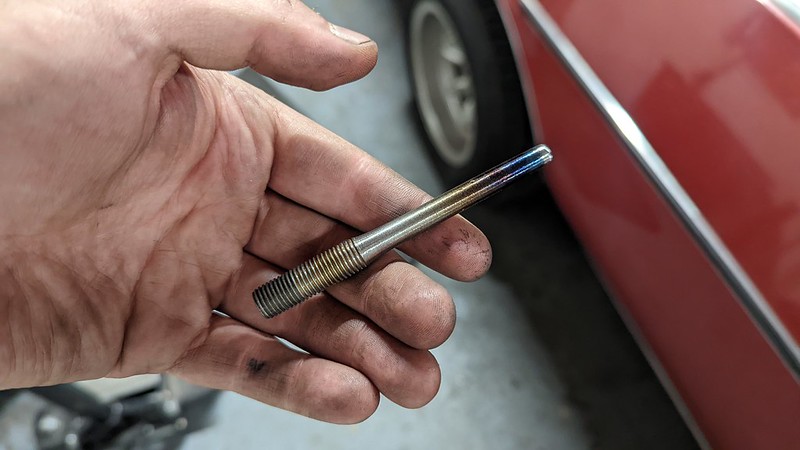 That threaded straight into the brake pedal clevis no trouble, and I adjusted it so it just has a tiny fraction of movement before engaging the master cylinder, then tightened up the lock nut. All done. So back to the engine bay. We made a mistake, well I did. My tee piece brake splitters, we obviously undid everything and had to re-bleed the braking system. Well I modified the front lines, re-flared and stuff. Everything leaked badly. Stripped out a brake splitter trying to do it up too tight. Basically had a nightmare, my mate stuck it out with me until after the sun came up to get it done haha. Anyway turns out the splitter wanted a bubble flare, not a double flare as I had been making. Ffs, literally just me being an idiot and using the wrong flaring tool. Oh well, it's done now. Spare trumpets on and with good clearance now: 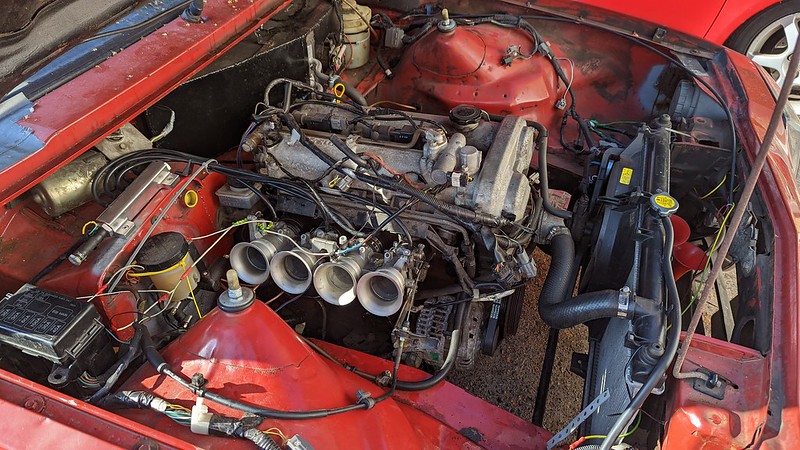 Need to finish some wiring, tuck some wires away, TPS wiring needs re-doing properly, it was just twist and taped here as the genuine TPS arrived and I had to re-wire it again and get that calibrated. Also note my throttle cable bracket we made, bolted to the throttle bodies this time! In my tiredness last week when first fitting these, I very stupidly made a throttle cable bracket that had a chassis mount point. Awful, can't believe I overlooked that. So when the engine jolts over a bump, leans on throttle etc. the throttle bracket didn't move with it. Hence super jerky throttle cable. Now fixed, it's like a different car haha. 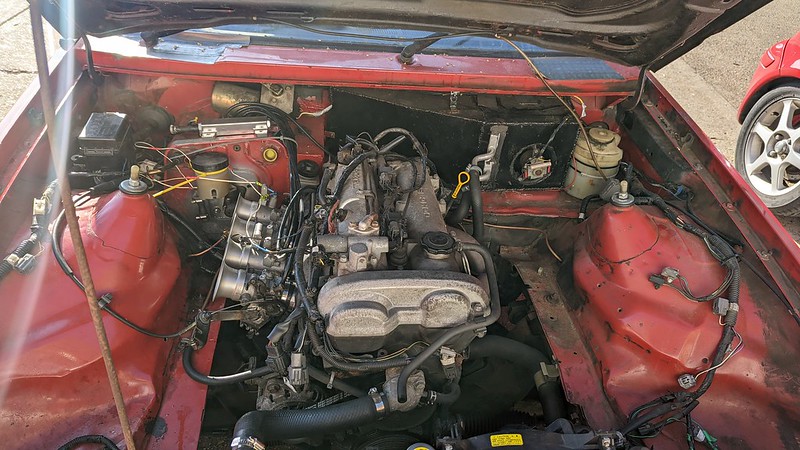 So much room for big trumpets now! Can't wait to get some monster ones haha. Going to redo my brake lines again, neaten them up properly, and while I'm there put a bias valve in for the rears, which I've been meaning to do for ages now. Anyway, the brake pedal. It's lovely now. No servo, no problem. It's not rock hard at all, and has good brake pedal feel, plus I have a ton more room in the bay, which is great. |
|