|
|
Post by boggissimo on Jun 16, 2023 8:50:20 GMT
I hope you are going to buy your mate a few pints for sticking with you on an all nighter! Great job, so much room in the engine bay it's only a matter of time before you fit a turbo now!
|
|
|
|
Post by Bilbo on Jun 16, 2023 21:00:44 GMT
I hope you are going to buy your mate a few pints for sticking with you on an all nighter! Great job, so much room in the engine bay it's only a matter of time before you fit a turbo now! He's not much of a drinker but I'll buy him a couple of packs of backy when I'm in Turkey next month 😂 Hahaha, loads of room for TRUMPETS. Not a turbo hahaha, stop it 😂 |
|
|
|
Post by Bilbo on Jun 19, 2023 13:50:56 GMT
Went to Players Classic at Goodwood on Saturday. Good show, lots of great cars there. Hayfever absolutely killed me though and I was just dying all day haha. There were a few patina cars in the Auto Finesse Concourse D'Elegance area, but it was still amusing seeing the Vauxhall amongst all these absolutely mint polished paint cars. 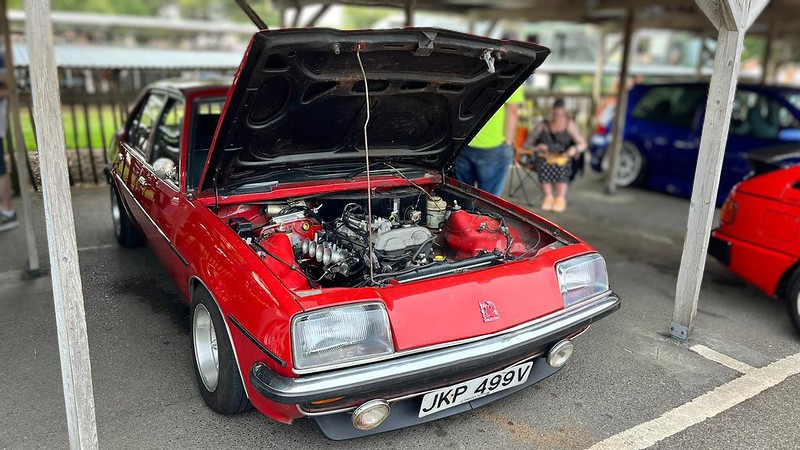 Was parked next to an absolutely beautiful Isuzu Piazza, I've seen it before at Retro Rides show. Really interesting obscure car, great to see it out and about. I've tidied up a bit more wiring now. Fitted the replacement genuine Suzuki TPS, got all the TPS wiring loom wrapped and tucked away. Fitted the throttle cam wheel/quadrant off of the MX-5 onto these throttle bodies now. It's so much better, it's way bigger than the GSXR one, completely OE pedal travel now, it makes driving with the ITBs, particularly in traffic, a lot more comfortable. The throttle also feels a little lighter, which is nice, it was a little heavy before. I just want to add an additional return spring of some sort, as I'd rather it snapped shut a little more aggressively than it does at the moment. 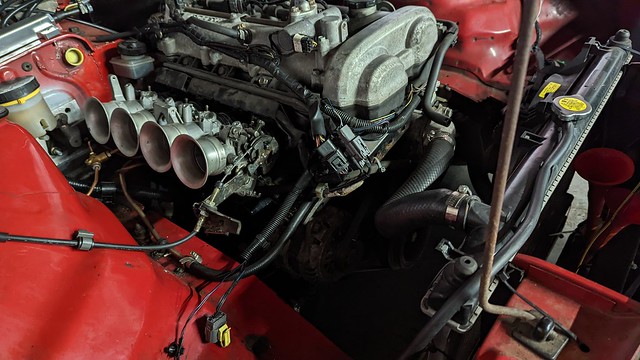 The setup is getting there now, been out with the laptop a fair bit. Cold and hot start are both spot on, really really good straight from the basemap. Idling immediately after hotstart I want to look at, as it idles extremely lean at first when hot, likely a result of heatsoak in the bay with it sat parked and hot. A bit of additional afterstart enrichment should sort that. Slowly smoothing out the VE table to get the fuelling right, takes a fair bit of time, but it's already way better than it was. Intake temps are good, when moving at a constant speed not much higher than atmospheric temp, when in traffic or driving slow not so good. I'm going to make up some form of shielding to separate the throttle bodies from the rest of the engine bay, and run a cold air feed to it. Should be fairly simple and make a decent difference. Overall it's getting there, still some bits to sort but very happy with the progress so far on the ITBs. |
|
|
|
Post by Bilbo on Jun 27, 2023 1:11:49 GMT
So, brakes. Again. The setup I had after the booster delete was just awful really. Not good, pedal too hard, everything a bit janky, it didn't leak but that was about all it had going for it. I spoke to Zed. who helped me with a load of questions I had re: converting to dual master cylinders, how to use a balance bar, and other considerations. Thanks mate! It helped an awful lot. So I decided to bite the bullet and just do it. I will pre-face this by saying another all nighter occurred during this a few days ago, and it really was a lot of research, reading, measuring, cutting etc. to get this done. So we start off with the balance bar: 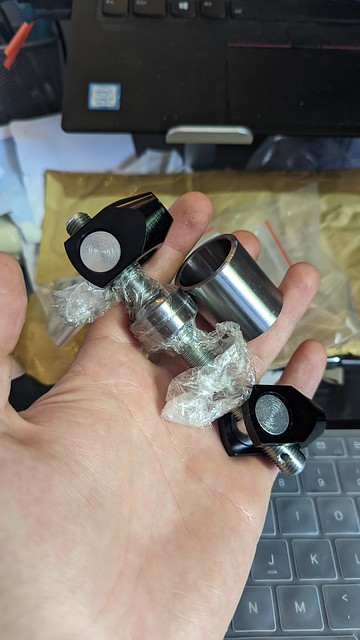 This is a balance/bias bar from Compbrake. Doesn't cost much, and in all honesty has done the job perfectly well. Had to get a couple of holesaws, the smaller of which to cut the pedal. Due to several different space constraint reasons I couldn't really raise my pushrod pivot point by much more than 13mm, so I marked 13mm up on the pedal from the original clevis lock pin point, drilled a pilot hole, and got the pedal cut for the balance bar centre tube. 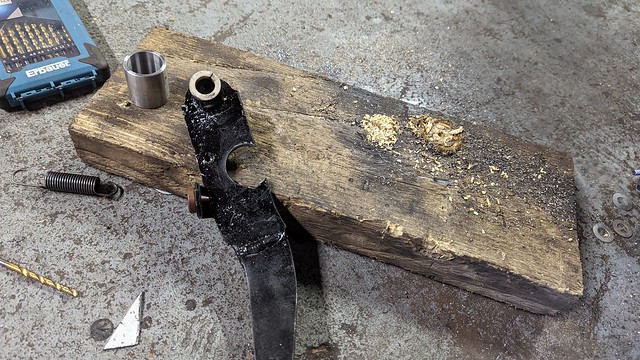 A good fit: 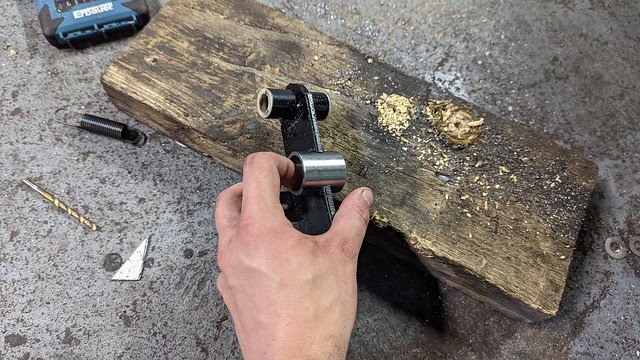 Why this far forward jutting out and not further back in the pedal? I didn't want my pushrods to be too long and when measured and mocked up this was the best spot for it. Not exactly the most godly welding you've ever seen, but that isn't going anywhere I can assure you haha. 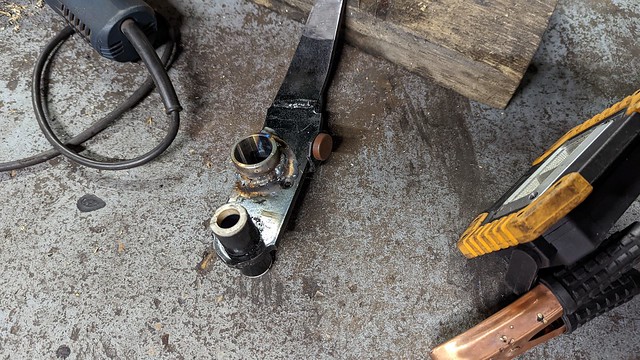 The inside didn't warp and the centre spherical bearing still slid in smoothly. So, onto the master cylinders. I had approx. 4.25" of space from the firewall to my cylinder 4 trumpet. That really isn't much. One dual circuit master cylinder was totally out of the question. So 2 single port master cylinders were all I could fit. I looked at various options, weighing up quality and cost. The Wilwood compact masters seemed like an absolute no brainer to me, really inexpensive, and only 4.1" long from firewall mount point to the end of the cylinder. Just small enough. Went with 0.625 bore for the front, and 0.70 bore for the rear, seems to be around what most resources recommend in general for a non-servo dual master brake setup. Now onto the pedal. It's a mk2.5 MX-5 brake pedal box from the car I sourced the engine/loom and just about everything else from. Well it was once. I already lopped off the throttle pedal portion a while back. Bolt pattern on it to mount through the firewall was 60mmx80mm, too big for what I needed now. With the balance bar set up with the clevises in the recommended position (just a few mm away from the centre tube on both sides) I needed the master cylinder through bolts to be 67mm apart, and the master cylinders use what appears to be a standard bolt spacing of 57.1mm for their 2 mount holes. So I welded up the original holes in the pedal, and drilled out new ones. Again 13mm higher, I wanted the pedal box in the exact same position in the car, and this would keep the raised pivot point on the pedal in line with the pushrods on the Wilwoods. I then used a larger holesaw in the centre of each pair of mounting holes, and drilled through to allow both new master cylinders to slot through: 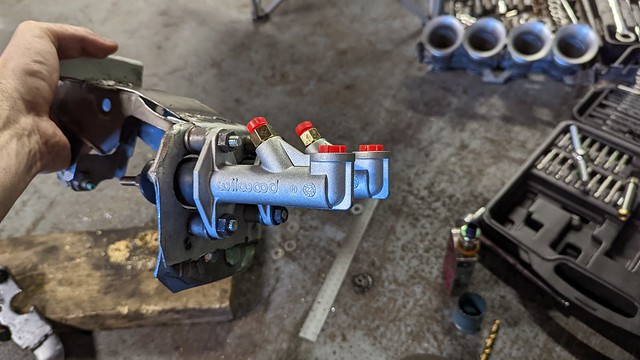 Note the spacers between the masters and the pedal, these were on the original pedal box, but I cut them off to make them a little shorter when I first made the original setup last year. We tacked these securely back in place once we were happy with everything. They both slot through nice and straight, 67mm apart as required by my balance bar. 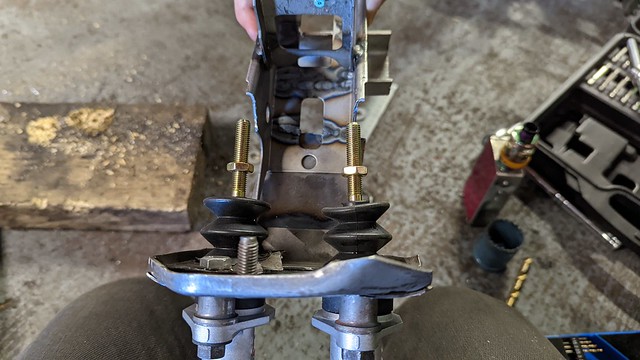 As you can see, a lot was cut off of the pedal box, so after this I added various bracing on the sides that angle up to the top, reinforcing the firewall face to the pedal mount part of the box. I also double skinned the front of the pedal box as I had removed the brace points on the inside, just to make it a bit stronger. Felt nice and sturdy. I needed as much engine bay space as possible, so I binned off the 5mm ali I used before and went with a thinner piece of steel. Much less soft than ali of course, but still works well as a bit of a load spreader plate type thing. Initial test fit: 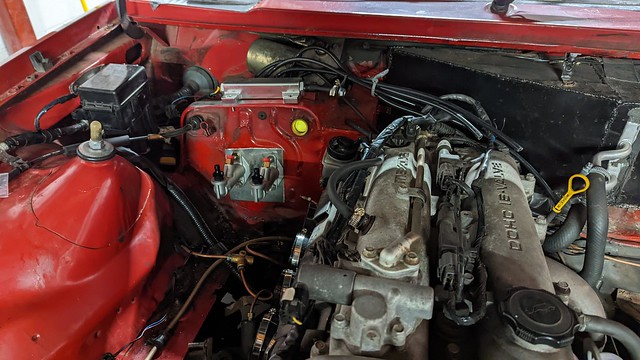 Of course I had to re-drill the firewall with the new bolt spacing, and holesaw the 2 new holes for the master cylinders. Again 13mm higher than before like the other bits, to keep the pedal box exactly where it was previously. When we were happy with this I got the pedal mounted inside, made up a sleeve and lock/jam nut for the balance bar, as Compbrake supply a remote adjustor cable for this balance bar separately, which I didn't go for, they don't include a lock nut. Was fairly simple to sort, I just had to go to a nut and bolt store to get a 7/16 20 nut, because apparently every chain hardware store literally only sells metric "M" sized stuff and literally no packs of imperial nuts. Oh well, it was 44p for 2 haha. Used a couple of very large washers between the clevises and the centre tube as recommended by Compbrake's fitting documentation, seemed to help a lot with keeping the clevises level and behaving, so I'm glad I did that. Brake lines were of course a total nightmare and took 2 days to sort out. Everything was done and then re-done again, this time it all seals properly, and not for lack of trying. A load of new unions, T pieces etc. Put a lot of hours into those bloody brake lines, thankfully a couple of mates helped me out a lot. We got it all bled, worked out a reservoir solution for the time being, and here we are: 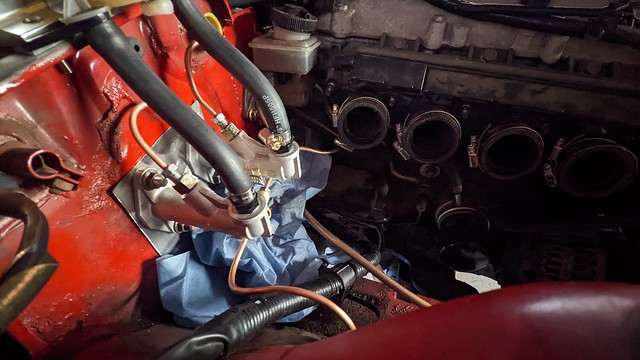 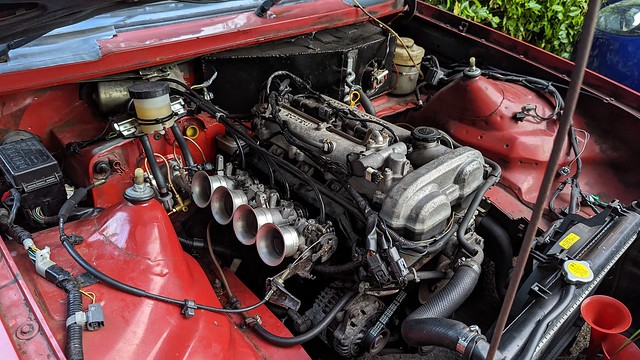 Just about short enough to clear the trumpets: 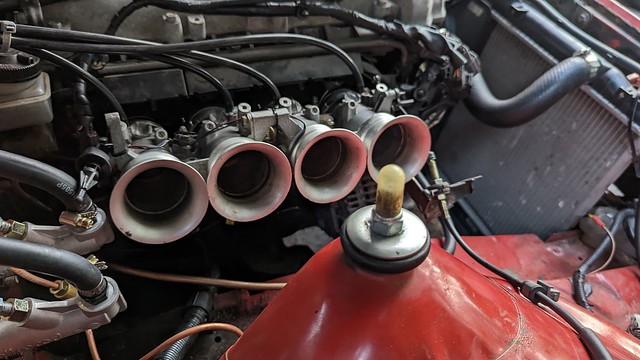 Still using the MX-5 brake reservoir for now, it has a divider at the bottom so if one cylinder/line fails, the other still has fluid up to the MIN level, which is good for now. But I am going to buy either a large single reservoir with completely isolated dual chambers, or 2 completely separate reservoirs. It will mean re-bleeding, but re-bleeding can't hurt, probably worth doing it again anyway. The pedal feels so much better. It's softer on initial braking now, so light braking is a lot nicer even with no booster now. When more braking is required the force is obviously higher than before when it was assisted, but it is a manageable amount of foot force, you don't have to brace your back into the seat and stand on it. Completely independent master cylinders too, so nice and safe, and with enough fluid displacement between them to power any potential brake upgrade I may do in the future. Seems funny running this setup with original front calipers and NOS pads, and rear drums, but in the long run this is the hard part, and it's now done and can be left alone, save for any adjustments to the balance bar, which can be done without disturbing the master cylinder or brake lines at all of course. But god it was a total slog to get it done, and honestly if I never have to deal with a leaking brake line ever again in my life I will honestly be so happy. Horrible job. Anyway the car is great now, bigger trumpets will be sorted soon ( I measured and have clearance for approx. 110mm trumpets) as well as the heatshielding I mentioned before. No filters are planned for them, this is a £200 engine. If a stone goes in, a stone goes in. We die like men.  I absolutely love this car. |
|
|
|
Post by boggissimo on Jun 27, 2023 8:11:30 GMT
Most people would have set fire to it long ago with the amount of work you've had to do! Really great to see your ingenuity and perseverance paying off  |
|
|
|
Post by scottydugg on Jun 27, 2023 10:19:38 GMT
Great to see your perseverance, there's always a solution, just depends on time and money sometimes! Trumpet clearance looks pretty good, certainly a lot of effort to achieve that.
Have you looked into brake upgrades that'll clear the wheels?
|
|
|
|
Post by Bilbo on Jun 27, 2023 10:50:55 GMT
Most people would have set fire to it long ago with the amount of work you've had to do! Really great to see your ingenuity and perseverance paying off  Haha, there have been a couple of times where I just sat back, lit a cigarette and stared at it wondering why I even bother 😂 Great to see your perseverance, there's always a solution, just depends on time and money sometimes! Trumpet clearance looks pretty good, certainly a lot of effort to achieve that. Have you looked into brake upgrades that'll clear the wheels? Yeah exactly, there's always a way, just a question of how much misery it is to get to it 😂 Yeah good clearance now, should be able to fit some decent length ones soon. Hmm, there's not much that'll go under 13s. General consensus is that the later style calipers (that I have) are worse. Single pot, horrible exposed slider pins that like to seize. The earlier 2 pot calipers are supposed to be better, so may go for those, but honestly these ones have been so far. I have seen that I can get Ferodo DS2500 pads that will fit my current calipers. Not exactly cheap but seem to be pretty good pads. Can also get braided front lines which were a good upgrade on the 5 so might do that too. As for the rears, MantaSport offer a caliper conversion kit to use MK4 Astra calipers. That may be an option in the future, though I'll need to check if MK4 Astra calipers would fit under 13s. Either way I'm keeping 13s, so it is what it is haha. |
|
|
|
Post by scottydugg on Jun 27, 2023 13:24:51 GMT
Solution = time + money x misery  Was going to say the 13's could prove a challenge but sounds like it's all in hand. Now you need a spare motor to make a high compression build  |
|
|
|
Post by Bilbo on Jul 1, 2023 23:14:28 GMT
Solution = time + money x misery  Was going to say the 13's could prove a challenge but sounds like it's all in hand. Now you need a spare motor to make a high compression build  Pretty much 😂 It's all in hand because I'm not touching them for now 😂 may just put decent pads on the fronts I have and braided lines and call it done. Ha, I am tempted to get a BP4W non-VVT head, do an exhintake mod on it, maybe like a 40 thou skim, refresh everything on the head and then swap it for my VVT one. VVT is good to have but it's noted by most who have researched it all that the BP4W heads do flow better, and if I wanted cams they seem easier/cheaper to get hold of than VVT ones. |
|
|
|
Post by Bilbo on Jul 24, 2023 16:24:50 GMT
Well, the MX-5 had the last few bits removed and has now been sacrificed to the mighty claw:  RIP, was a great car, but it had run its course for me. Anyway that means this is now officially my only car, the daily, the fun car, the workhorse, everything.  Can't complain really, I did say right on my first ever post about this car that I get bored and need an interesting daily. So I guess I've stuck to my guns with that haha. Went to a morning classic meet with a few mates. AE86, XR2 rep (1.8 Zetec swap, pretty quick little thing!), MX-5 drift car, and mine in our group.  Anyway, all was good and some nice stuff there as well! I had started encountering a rich running issue last week. I noticed the car seemed too rich across the board, idle, cruise, and on full throttle. A little odd as the map isn't too bad now on the ECU, and the Lambda Control has some authority to correct any deviations to match the target AFRs. So I got the laptop connected and noticed the AFR the ECU was seeing was higher than what my gauge read (gauge was accurate to actual AFR). Gauge was reading about 13.1 on idle, and the ECU was seeing around 14.5, with a load of noise visible in real time view, it was jumping up and down quite wildly. After some head scratching, chasing and cleaning earths, unplugging things to check for shorts, it turned out it was the main engine earth to the body. I had obviously caused an issue with it when I had grounded my new coolant sensor to the same place. Removed it and re-fitted and everything went back to normal and has been fine ever since. Idle now sits pretty much bang on around stoich as it should:  After fixing that earth, the ECU stopped adding extra fuel and the difference between the gauge and the ECU reading is now 0.1 AFR tops, and no noise, much much better. Temp sensor reads about 4 or 5 degrees high, on laptop the actual number when sat idling when fully warmed up will top out at about 92 degrees. But it's close enough to warn me if it ever goes into the red. While I had the laptop out I thought I'd have a look at the VVT settings. I couldn't seem to get the VVT solenoid to actually work before, I've essentially been running with no VVT. But it's not like VTEC on a DOHC Civic, so the difference with it not activated isn't as immediately obvious. I swapped the solenoid for another one and still nothing, so it wasn't a burned out solenoid causing it. Poured through all of the ME221 documentation I could, and finally noticed the issue. In the Input/Output (IO) settings I noticed that the VVT Solenoid wasn't present in any of the fields. Meaning that there was no setting in my map that actually told the VVT solenoid to do anything. A little bit odd as this was one of ME's own official VVT 01-05 basemaps. I had a look through the user documentation and found that the VVT solenoid was supposed to be linked to the "LS9" output. In my map that is where the idle valve was selected. I no longer have an idle valve, but this goes a way to explain why my idle valve never really worked that well when I first fitted the ECU without ITBs, as that was supposed to be on a different output setting. Anyway I swapped the LS9 option over to the VVT, and immediately it started working. I tested the VVT function by adding VVT timing at idle, and it shot straight up to around my chosen number. A little bit of messing with the PID settings and it would hit my number, not overshoot, and not oscillate too much. It also made the idle sound hilarious. The child in me wants to leave it with the "Ghost Cam" lumpy idle, but it is stupid and uses way more fuel. Anyway, after looking up VVT tuning, what others use, recommendations for its use etc. it became immediately apparent that the VVT table on the basemap was pretty horrible. VVT advance across the entire map, all the way down to the overrun fields, it didn't really make any sense. This was my first attempt at clearing it up and making it more sane:  You can see here the Current Advance sat at 40, which is what I set it at for idle for test purposes. All working really nicely. Now the main thing will be to remove the 25 degree advance lower down, it really isn't needed at such small throttle inputs, from all the discussion I could find on it no one suggested mapping the VVT for low throttle cruise. You'll also notice it taper off quite heavily towards the redline, it seems the VVT on these is most effectively used to boost mid range performance. Obviously it is essentially a stab in the dark doing this not on a dyno, but now it is working I want it to work sanely, so cleaning up the table to at least get it ballpark seemed a good idea. Going to pull out the VVT advance for lower throttle inputs, and mess with the higher regions a bit. Also going to smooth out the regions where it goes from 0-20 etc. so it has smoother activation state, not just jumping up immediately to higher advance. From the driving I have done it feels fine, I can't say the midrange feels crazy different, but it certainly hasn't hurt at all. It's been good fun to play around with, and I'm glad that I've got it working. |
|
|
|
Post by boggissimo on Jul 24, 2023 19:23:47 GMT
If you could be rear canoed, and assuming you can save and implement multiple different maps without too much trouble, maybe try it with the VVT switched off, do a run round a set route, then switch it on and do the route again, see if you notice much difference? They wouldn't have bothered engineering it if nothing changed!
|
|
|
|
Post by Bilbo on Aug 7, 2023 10:56:31 GMT
If you could be rear canoed, and assuming you can save and implement multiple different maps without too much trouble, maybe try it with the VVT switched off, do a run round a set route, then switch it on and do the route again, see if you notice much difference? They wouldn't have bothered engineering it if nothing changed! Yeah for sure, I'll probably switch it back off and see the difference. I've cleaned up the VVT table a bit more now (less advance at low throttle) and it's definitely a bit nicer. |
|
|
|
Post by Bilbo on Aug 7, 2023 11:17:57 GMT
I had a wedding to attend on Friday, so I actually bothered to clear the car out, and give it a good old hoover. It's quite nice seeing it a bit cleaner in there!  Had 2 passengers in the back, they liked how comfy the seats are (honestly ridiculous, they're like a sofa!), but we hadn't told them there were no belts until they got in the car and one of them was absolutely terrified 😂 Anyway, we survived, so all good. Not a huge amount else going on, I went out late one evening and did some more mapping, I've got the cruise dialled in really nicely now, the ECU barely uses any fuel correction (stays under 5% almost the entire time) to keep the AFRs on target. Leaned out the cruise a bit to around 15.2, so probably see a small fuel saving over before. Also dialled in the acceleration enrichment a bit better, quick jabs of the throttle seem a lot happier now. It's still not bang on perfect, but it takes a while to get these things right. Certainly makes it feel a lot nicer than it did before. Had a look at my door bottoms, driver's front is the worst. It's not the end of the world, but I'll need to address this soon I think:  They're not awful, but 1 more winter I think they'll be far beyond their best. I did have a bit of an incident though, nothing terrible. Was driving along yesterday, noticed gearshift felt odd, almost like it was going too far into gear if that makes sense. The throw felt a bit off. Anyway I joined a very short slip road onto the duals, and as I banged it from the top of 2nd into 3rd it all went a bit wrong 😂 Straight into neutral and banging limiter as I hit the throttle again. The gear knob in my hand went all limp and started just flapping around. I thought oh god, my extended shifter has given up. And it had. Pulled into a layby and had a look. Yep, that'll do it:  The tape has been good as a sound deadening/reducing heat in the car type thing, though it does look a little ugly. So basically I made this makeshift shifter up when I built the car. It was only ever meant to be temporary tbh. As the 5 shifter was too close to the handbrake, I took a standard MX-5 shifter, cut it at it's base, and welded in a thick extension rod that brought it forward by about 7-8 inches. Then welded the original threaded shifter part to the front. Well my welds didn't fail, which is always nice to know, but the actual metal itself decided to completely sheer off. I'm not exactly soft on the shifts sometimes, I do like banging it from gear to gear, so I guess this is to be expected. This shifter has never been great, obviously as it is on a horizontal extension, the throw is exaggerated quite dramatically. But it felt quite in keeping with the retro car, having a longer throw, so it never really bothered me. For now the plan will be to fix this temporarily, with some added strengthening put in place. But longer term I want to build a fixed relocated shifter, like this one I found online:  Having the gearbox end on a bush, and the actual shifter on a rose joint will mean the standard MX-5 throw will be kept as it should be. Should make the gear shifts feel a lot more sporty and short, which won't hurt. I guess this is very similar to how some FWD cars work, my old Civic had a very long bar with a bush either side that was basically the same principle as the setup above really. It make sense to do this. But at the time I just wanted the car on the road. My current setup lasted quite well all things considered, done a good few thousand miles without issue. But I guess this is my prompt to actually sort it out properly this time! |
|
|
|
Post by dadbif on Aug 8, 2023 7:47:15 GMT
That looks great for fore and aft shifting but flimsy for lateral shifts. Could do with two outer rods rather than the one inner.
Just my thoughts…
|
|
|
|
Post by Bilbo on Aug 8, 2023 11:38:18 GMT
That looks great for fore and aft shifting but flimsy for lateral shifts. Could do with two outer rods rather than the one inner. Just my thoughts… That's interesting, I hadn't really thought about this, I think it's going to be a case of trial and error. Anything will be an improvement over what I had for sure, but perfecting it might take a few prototypes. I have now planned out roughly what I'm going to do. Very similar idea to the image I posted above yesterday. Made a little diagram of the planned setup:  The relocation bar will likely have a standard cylindrical bush on the box side, allowing the bar to pivot up or down, depending on the selected gear. I could just hard mount this, but as I am planning to bolt it directly to the relocated shifter on the front side, I assumed this would cause a lot of tension/stiff shifts if the bar can't pivot itself to remain perfectly flat. As for the front, a strong U/C shaped bracket bolted directly to the tunnel, with a clevis going through it. I'll likely just use an M8 bolt and flap disc the threads off in the centre so it is a smooth cylinder. There will be a rose joint on this clevis that will thread into the bottom of the gear stick, which will allow the gear stick itself to pivot as necessary, but anchoring it in position relative to the rear. In my head this works, and when done should give the exact same throw as an original shifter in the 5 gearbox would give. I've been meaning to do this since before the car was even on the road. Seeing as the shifter needs to be repaired anyway, it makes sense to just do it properly this time. But we'll see how it goes, this is all a bit of an unknown to me. |
|