|
|
Post by Bilbo on Nov 23, 2022 17:12:02 GMT
Is there a dimmer on the dash lighting? ISTR it was a popular feature on VX/Opel back then. Rotary switch somewhere on the dash. ^^THIS unless tou've the cheapest 'poverty spec' car ever made  Rich. Didn't see one in the car. It was a 2000 GL so I don't think it was pov spec. Also now I think about it the entire Vauxhall loom is gone, so the dimmer isn't even in the equation even if there was one. Just putting it down to terrible bulbs and will get some LEDs 😂 |
|
|
|
Post by wannabe on Nov 23, 2022 17:12:02 GMT
Thought: If the ECU is (easily accessible) in the glovebox, are you going to make it easily removable as a security feature? (Does it just push into the connector blocks?) WRT the terrible dash lights  you could consider buying some Superluminova or similar product and painting the needles and the main markers - they might glow a little in the dark and aid reading of them, although good luck with seeing anything after being blinded by those Canoeing Tailgate McNoIndicate and other LED dipped beams nowadays.  |
|
|
|
Post by Bilbo on Nov 23, 2022 17:15:14 GMT
Thought: If the ECU is (easily accessible) in the glovebox, are you going to make it easily removable as a security feature? (Does it just push into the connector blocks?) WRT the terrible dash lights  you could consider buying some Superluminova or similar product and painting the needles and the main markers - they might glow a little in the dark and aid reading of them, although good luck with seeing anything after being blinded by those Canoeing Tailgate McNoIndicate and other LED dipped beams nowadays.  Haha no I hadn't planned on removing it, it's in there quite tight now and would be a ballache, but I am planning on wiring the horn to go off constantly if someone tries to steal it. It will have some super loud air horns on so that will be fun if they try haha. Good idea on the dials, I'll look into that, not really considered it before. As for being blinded, yeah in the 5 I get blinded constantly, if a van with LED lights is behind me it's basically game over until they're gone haha. |
|
|
|
Post by Bilbo on Nov 28, 2022 2:03:30 GMT
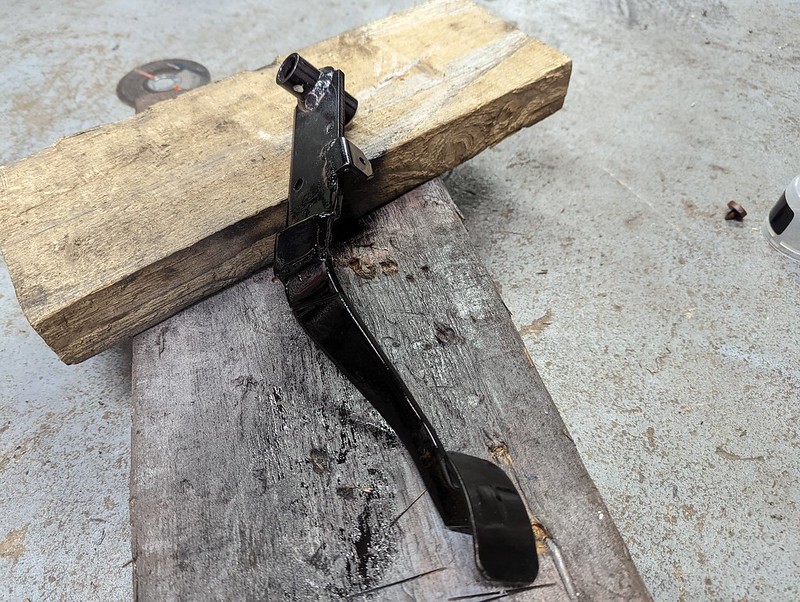
So got a load done this weekend. Started with the rust holes above the throttle pedal After poking and buzzing back the little holes we had this:  Inside the front arch these holes also spread into the engine bay, it was an awkward one to sort out given the shape. But I made up a couple of plates and got it all sorted. Here's the area now after welding, seam sealing, priming, and underseal:  Much better. Wanted to get this sorted before it spread to the throttle mount plate as that would have been annoying to re-make. There was about 8 separate holes in this area, so it's good to get it all sorted out before it got too advanced. I stuck the super bright LED light in the arch (we call it the flashbang) and no signs of any light coming through except for the 3 throttle screw holes:  Ignore my primer runs haha, Painting in a cramped footwell isn't fun, now sorted. Anyway, with this sorted I got to taping/cable tying the loom down in various places, and got the routing into the boot of both the cabin loom and main power wires that come through the floor all sorted. I've tucked it down as tight to the floor as possible to avoid any carpet bulges or issues with contact with the rear seats. Carpet going in:  Rear seats were super simple to fit, and no issues with the wiring either, all mounted fine:  You really wouldn't know there are 2 fairly chunky bits of harness on the left side of this photo, I'm very pleased with how well it is hidden. Rear door cards in, 3 ashtrays in this car haha, very old school.  Speaking of ashtrays, I noticed when fitting them one still had something in. As well as 5 presumably Marlboro Reds, there was also an old KitKat wrapper:  Best Before 1 Oct 1990! 80s KitKat! Might put it in the windscreen like an old tax disc haha. Funny thing is this car was last taxed 1997, so this had sat in that ashtray for at least 7 years while the car was still being used. Front belts all bolted in:  The buckles were a bit sticky on the button, obviously been sat for years, so after a few uses they have freed up again and work perfectly. Belts both retract and lock as they should, drivers one is a bit noisy when retracting though, but it doesn't affect it's operation. Decided to put the front passenger seat in, driver's side I have some more bits to finish on the dash so keeping the extra space for now. These seat rails are well janky, I don't like this setup at all haha. Such weird rear plates, with this long hook shaped metal piece that the seat and rail contact each other with, and the rear sliders aren't sliders that I am used to in runners, it's just a heavy duty plastic strip on each side that the seat slide points run backwards and forwards on. The front points are just basic U clamps on the front bare of the seats. It's an old school setup for sure, I don't like it, but the seat seems to be in well enough so it'll do for now:  You can see the slider strips I'm talking about above. A little primitive looking to say the least! Sadly this seat isn't in as good condition as the driver's seat or the rear seats, with a long tear on it. Other than that it's ok though, and fairly comfortable, if not a little high. Also got my brake pedal sorted. It was too long, and too close to the clutch pedal. So I removed it, heated it up, and got it bent a bit more:  I shortened it by an inch or so, cut a piece out, butted the pedal back up, and seam welded it both sides. Ground one side down completely, and then took the cut out piece and added it as a sort of strengthening plate to brace the pedal over where it was welded. It was plenty strong, but it was just butt welded together, and being such an important piece of the car, I decided it was worth making it way stronger than needed, just for peace of mind.  Once it was cooled I gave it a coat of primer and then gloss black, almost looks OEM:  Naturally I had to strength test it, so I gave it some hefty hits with the lump hammer, very scientific as always, and it isn't going anywhere. Happy with how it has turned out, and it now matches the height of the throttle pedal perfectly and is in a much better position between the clutch and throttle. Got a few other bits sorted out this weekend as well, got the loom mounted under the car, tucked up where it needs to be, with some additional insulation wrapped around it. Also added some extra wire length to the speaker wiring so I can place them wherever is convenient, and got the heater fan wiring extended and routed into the bay, ready for my heater box build I'll be doing next week. Also checked over a few extra plugs and lengths of wiring, and got a few of them cut off that aren't needed, which made it a bit less untidy, particularly on the passenger side. I've got one of the door switches wired in now, just need to do the other one. And finally I got my instrument light earth permanently mounted, and they work perfectly when lights are turned on, I just need to replace the cluster lighting to something with better light output. |
|
|
|
Post by Bilbo on Nov 30, 2022 2:26:14 GMT
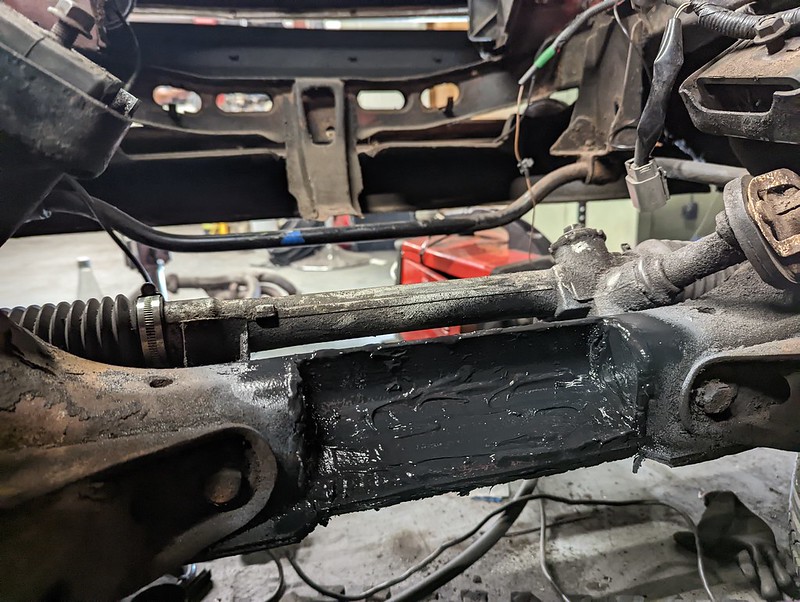
I was planning to fit the engine tonight, and then remembered the subframe hasn't been braced yet. Stupid oversight really haha. Anyway my mate who did the engine mounts and gearbox mounts has just bought a house, so he's been crazy busy. Decided I may as well give it a go myself, I rebuilt the jacking point and that didn't collapse when I used it, so might as well do this too. I made some end plates to slot inside the subframe from some decent thick steel. I think it was 5mm. Got those welded in to close the ends off, and then I took the original cut out from the subframe that I kept, flipped it around, and got it welded on. I had made an additional cut after the original one, which I didn't keep, so I needed a little extra plate to make it reach the end of the subframe.  So there it is, not exactly Instagram worthy #weldporn, but it's plenty strong. Couple of ugly add-on bits I did in areas I wasn't completely happy with after the first pass, got those ground back and I was happy. Got some seam sealer on the welds, primed, and painted. Should give it plenty of protection, and I think it looks alright.  The good thing about the subframe is it has round holes underneath, so I can get to all of the inside of the bracing to spray it with paint/cavity wax on an extension nozzle like I did with the sills. Now this is done, I can get the engine in tomorrow! I want to do a test fire asap, then we're really on the final stretch. |
|
|
|
Post by Bilbo on Dec 1, 2022 10:13:49 GMT
So, progress! Turned my attention to the engine last night. I looked up an EGR blanking kit for the VVT engine, and like that classic Clarkson scene I said "I'm not paying 13 quid". So I just made a little blanking plate for the intake manifold out of some scrap ally I had lying around, and lopped the EGR bung off the exhaust manifold and welded the hole up.  Hardly a professional product, but I bolted it on with a little sealant and it does the same job. It's also totally hidden so I really don't care what it looks like. Then I got the engine mounts bolted back to the engine, removed the original clutch spiral hard line, got a couple of other things sorted on it, and got it on the crane. My mate gave me a hand lowering it into the bay, and now it's in (hopefully for the last time!)  The good news is, after removing the original cut hard line from the clutch master, it fits with ease!  Ok it looks quite tight here, but there's actually a fair amount of room, can definitely get a hand and a brake spanner in there to get a braided clutch line on for sure. I'm going to buy one with an angled end piece on, just to make it a little bit easier, but no dramas at all, this master cylinder fits. Thank god. The loom is a little tight annoyingly, the TPS, IACV valve, and a couple of other plugs don't quite reach. I have pulled it through the firewall as much as I can (the rubber bung now needs to be cut and moved back a way to re-fit into the firewall. A little annoying, but I think I need to extend maybe 3 plugs tops and the engine will all be able to be plugged in. My biggest headache is the exhaust manifold, now the routing under the car will be fine I think, lots of room, no issues. But cylinder 2 hits the engine mount due to the way the mounts are on the subframe, so we're going to need to modify the manifold a fair bit to get it to fit. I need to look at options here, but it should be something we can sort out without a huge amount of problems. I've also ordered some exhaust bits, new mid silencer, couple of reducer pipes, backbox etc, so that'll be sorted in the next couple of weeks, I'm just cobbling together a system from various parts. Couldn't be bothered to pay 200 odd quid for a system that I would want to cut for a new backbox style anyway. |
|
|
|
Post by Zed. on Dec 1, 2022 19:54:14 GMT
My biggest headache is the exhaust manifold, now the routing under the car will be fine I think, lots of room, no issues. But cylinder 2 hits the engine mount due to the way the mounts are on the subframe, so we're going to need to modify the manifold a fair bit to get it to fit.  I need to look at options here should'nt that be... I need to look at making a new mount that fits properly as modifying the manifold could loose power....  Rich. |
|
|
|
Post by Bilbo on Dec 3, 2022 4:36:23 GMT
My biggest headache is the exhaust manifold, now the routing under the car will be fine I think, lots of room, no issues. But cylinder 2 hits the engine mount due to the way the mounts are on the subframe, so we're going to need to modify the manifold a fair bit to get it to fit.  I need to look at options here should'nt that be... I need to look at making a new mount that fits properly as modifying the manifold could loose power....  Rich. True, and it turns out it wasn't an issue re: the engine mount! |
|
|
|
Post by Bilbo on Dec 3, 2022 4:38:25 GMT
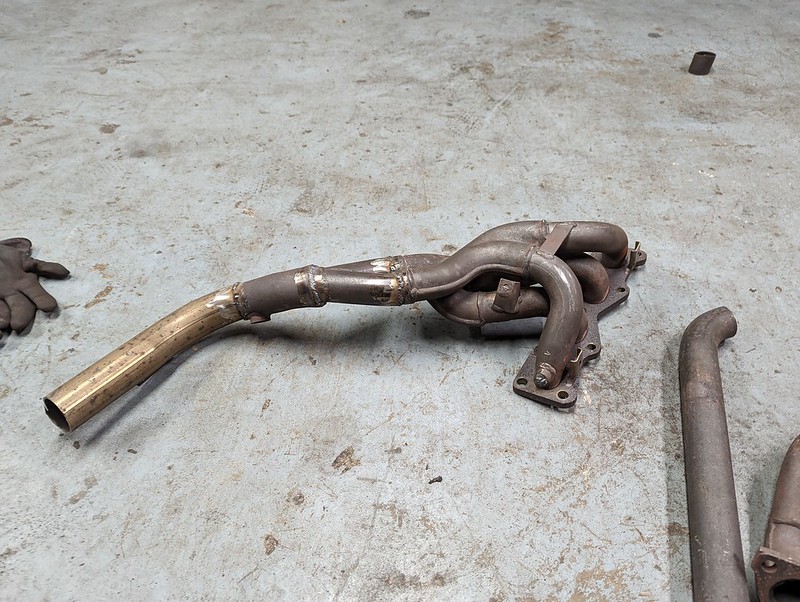
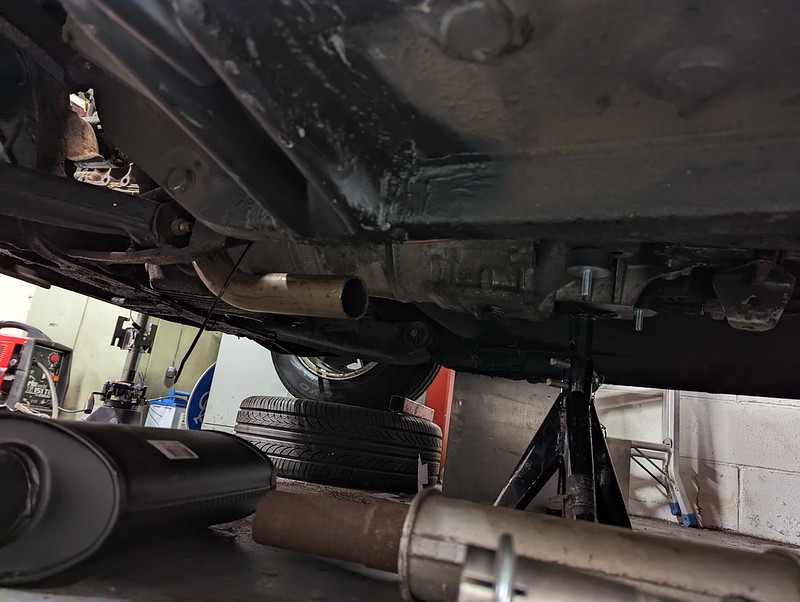
So after going back after a day off and having a go at the manifold again, the main upper manifold fits. I unbolted it from the (unsuitable) downpipe, and could then slide it on at a better angle and the cylinder 2 pipe just about clears the engine mount. It's close but it should be alright. Now it was clear that the downpipe section wasn't suitable at all. It didn't bend far enough away from the rear leg of subframe, the o2 sensor bung was too close to the floorpan/tunnel so the sensor wouldn't fit, and it didn't end in a place that was particular useful for mounting a midpipe too. As well as this the manifold/downpipe flange was just too close to the tunnel for my liking, there was just not enough room. I looked at aftermarket manifolds, but really all of them route a very similar way, they may be a little better, but the downpipe sections would still need adapting fairly heavily to actually work. To be honest I just don't have the budget to be spending on things that aren't 100% needed right now, so I've made use of what I have. I needed to remove the flange section, re-angle the downpipe, move the o2 bung, and add a bend so that it would sit nice and straight under the car for a midpipe to bolt to. So I took the original manifold, cut the flange off, chopped up my mate's old cracked 4AGE manifold and used a perfectly sized Y piece from it. Re-used the collector section of my original downpipe with the o2 sensor in, angled it so that the subframe was no longer an issue, then used another bend I had off of my old TSport Yaris for the end of the downpipe. Here it is:  Is it perfect? Probably not. Will it give the best performance of any manifold for this engine? Probably not. Is the end stainless and the rest not? It is. But honestly I don't care right now, I'm really happy with how it has come out. The welding went really well on this, I'm still learning and I'm so pleased about how it all went. Got each piece tacked on, test fitted, adjusted if needed, then welded up fully. It fits an absolute dream, it clears everything, it bolts up, no contact issues with the tunnel or subframe, and the o2 sensor threads in and has plenty of wire length to plug in to the harness. For now it's ideal. Again my welding is hardly worthy of any awards, but the progress I've seen in it since I started this car is great, I can still see areas I can improve, but it's plenty good enough I think, I'm quite proud of this:  At the end of the day this isn't going to be a competition or track car, if it works ok and doesn't blow I'm happy. Here's how it sits underneath the car, it's pretty much bang on the perfect height for me to connect a midpipe back to the rear silencer and axle bend section, will start sorting that out on Sunday.  It looks a little low here, but it's just the angle of the photo, it's about as perfect as I could get it. I'll likely add a flexi in to the system to make sure it doesn't crack. I got my power loom pulled through a bit more so I could get the starter motor plugged in. Got it on, and decided to give cranking the car a go with the fuel pump still unplugged. Turned the key and the battery light and oil pressure light are both working in the cluster, which is great news. Anyway, not sure if this will work but try clicking the photo below, should show you a short video:  It cranks! Nothing dodgy happened, no fuses/relays or anything else blew. One step closer to a first start attempt! |
|
|
|
Post by Bilbo on Dec 5, 2022 1:17:40 GMT
Got original axle bend and backbox off this evening. They were in pretty terrible condition. I managed to get the midpipe and axle bend section sorted as well. I cut off the original silencer and re-used the bend, it's a very specific shape and the pipe had no holes and was perfectly usable, it was just a bit rusty. Got my new silencer welded to it and painted the bend with VHT manifold paint, just to make it last a bit longer and not rust out immediately. Welded the hanger brace onto the new silencer like the original was, all fits quite well. The original basically fell apart when I cut and pulled the pipe out of it. Also the backbox in the background was pretty horrendous too!  When this was done I got those bits roughly sleeved together and mounted, I'll sort the backbox section when the bullet silencer turns up this week. After this I got a few bits sorted on the engine, moved the bung for the engine loom down to the firewall cut, got a few plugs extended, and plugged the MAF and original intake in. I'll probably change the intake, but this was just for a first start.  I chucked 5l of fuel in the tank, temporarily attached the fuel hard line to the engine, and attached the engine earth to the body. Gave everything a once over and then just went for it. It runs! It actually runs, starts fine, and revs like it should. I'm so pleased, this is a massive milestone. A few bits to sort, my fuel feed into the fuel filter is only attached with a hose clip, the others are nearly all proper jubilees and are perfect, but that one leaks pretty badly into the boot. So I'll get some more decent jubilees and get that changed over. None of the fuel lines popped off though, I turned the key to prime the rail a few times and that's the only issue really. My T piece and fuel return seem to be working as they should, the returnless line to the front of the car seems all good. The car was struggling to idle, but I think it's the fuel line not being able to pressurise properly due to the leak, I'll sort that and try again. The oil pressure warning light works too, and extinguishes when the engine has started. Fuel gauge appears to work as well, may be over-reading a bit, I'll need to check that. All in all great progress tonight and so excited to get the last few bits done on the engine. |
|
|
|
Post by boggissimo on Dec 5, 2022 10:37:08 GMT
Fantastic! Great to see all that hard work paying off  |
|
|
|
Post by Bilbo on Dec 5, 2022 13:22:56 GMT
Fantastic! Great to see all that hard work paying off  Thanks mate, yeah it's a great feeling to see it fire up! |
|
|
|
Post by wannabe on Dec 5, 2022 17:33:40 GMT
Awesome progress  I'm sure that leak can't smell of petrol any worse than the silver 5 did when you gave me a lift   lol |
|
|
|
Post by Bilbo on Dec 5, 2022 18:18:16 GMT
Awesome progress  I'm sure that leak can't smell of petrol any worse than the silver 5 did when you gave me a lift   lol Hahaha, that car was running a little rich at that time yeah. And no, this smells of that pure fuel smell, not even fumes, just raw fuel. It evaporated pretty quickly. Luckily no carpet in the boot yet so no material got soaked. |
|
|
|
Post by Bilbo on Dec 7, 2022 1:21:20 GMT
Got the exhaust backbox sorted tonight. I have a flexi coming for midpipe so I will cut it and put that in this week, it also hangs way too low so I'll sort that too. The rear section is sleeved onto the end of the axle bend, I found some suitable sized pipe and got it welded onto the bullet silencer I bought, which turned up today. I need to weld a hanger on, it's just cable tied into the rear hanger rubber at the moment so I could check it's placement.    I think it came out alright, it looks pretty good and I think it looks fairly retro and suits the back end of the car. I sorted out my boot fuel leak by replacing the hose clamp with a decent jubilee. Then I had some issues starting the car, it would crank but just wouldn't fire properly, kept dying or running on it seemed 1 cylinder. Anyway turned out it was just too low on fuel haha, luckily my mate had a full Jerry can lying around, so I filled it up a little and gave it another go. Bit smokey from all the false starts I tried, and engine has been sat a while, but that will clear when I can run it for longer once the cooling system is all hooked up. I think it sounds alright, bit raspy but it's not too loud in person. It'll do, we'll see what it's like under load when the car is driving. |
|