How To: Over-the-Rad Intercooler
Jul 29, 2016 15:45:34 GMT
atlex, onepaintedman, and 1 more like this
Post by myothercarsa2cv on Jul 29, 2016 15:45:34 GMT
I thought I'd write this up as it might be useful for someone who fancies a go at DIYing. I'll mainly focus on how I built my setup (TR Lane M45). This is by no means as comprehensive as it could be, and it will also not result in a Formula One team-quality setup. But it will be functional! Which is all that matters really. As I make refinements here and there, and if I remember, I'll update the post. There are continuity errors in the photos but hopefully it makes sense!
An over-the-radiator intercooler is ideal for supercharged cars - they require as little throttled volume as possible, especially those with a single throttle body, to give you good throttle response. It's less important on a turbo, but can't hurt. Another advantage is that you can reduce the number of clamps you use down to 8, which reduces the potential leak points massively. It also looks excellent.
There aren't many off-the-shelf kits out there - in fact, I think it's just Track Dog Racing that do one, and that's over $1000 before shipping, VAT and import duty. Ugh. So considering many people had done it before me, I wondered - how hard can it be? As it turns out, it's doable, but it's not easy.
You will need:
1. An intercooler with outlets on the top. I used a Toyosports off eBay (like this one).
2. Pipework. Decide what diameter pipework you want to use. I used 2.25" but 2" is plenty and gives you more room under the bonnet. It is entirely possible to use 2.25" without trimming the bonnet, but anything larger may need a spot of Dremel action. For the hot side, I used a long-legged (600mm) 90 degree bend. The cold side needed 3 90 degree bends to negotiate the rad cap - on the Fast5 rad, this is raised and going straight over it without drastically lowering the rad means it would foul the bonnet. It also meant I could re-use a bend I already had with the IAT sensor bung welded in, saving me money!
3. Reducers (x4) and appropriately sized clamps (x8). Reuse existing ones if you like. Jubilee clips are fine and probably better than Mikalor clamps anyway.
4. 8mm threaded rod, M8 nuts and some 2mm steel strap (about 30cm is plenty, but I reused bits I found on the car).
5. Slimline fans. Because you'll be lowering the rad and leaning it back, you'll need slimline fans so they don't foul the ARB.
6. Tools. A hand drill with assorted bits, a hammer (!), a Dremel would be useful but not necessary, and selection of the usual tools (sockets, spanners, etc.).
Total cost for parts for me was around £200 (excluding tools). If you need to have someone do some of the work, e.g. welding,for you then that will obviously be extra. I used Nick @ Skuzzle for the welds, but made the chops myself to get it roughly in the right place for him.
So. First up, get the car in comfortable place to work on. It's going to take a little while! You don't need to jack it up but it does make a few bits easier to do. It's likely to take a couple of days so park the car somewhere you can leave it in bits. This is probably not a do-on-the-street job!
Right, let's get started...
1. Open the bonnet, suck some air through your teeth, sip your tea, and confirm with yourself that you're happy to start chopping up your car. If you're unsure, please consult a specialist like Skuzzle.
2. Remove the sidelights, then the bumper. Depending on how many bolts you've lost over the years, it could be many to undo, it could be few. Pretty much all you need is a 10mm socket/spanner. This also means dropping the undertray. Don't forget the little support struts in the wheel arch.
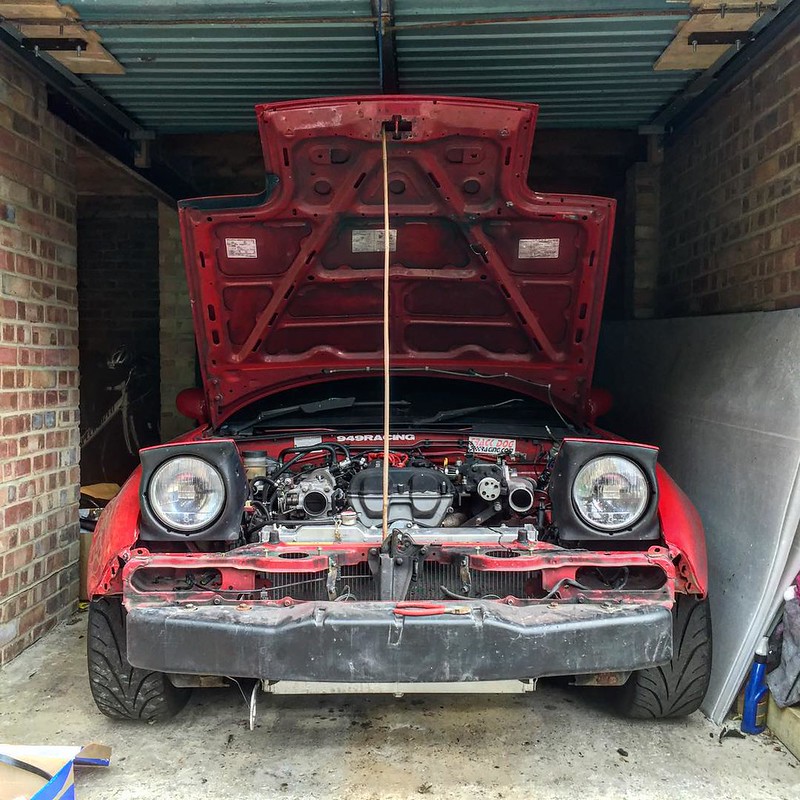
3. Remove the bumper support plastic lump thing. 8x14mm bolts hold this one. Put the bolts back in the holes for safe keeping. Top tip: mark which side of the support is the top!
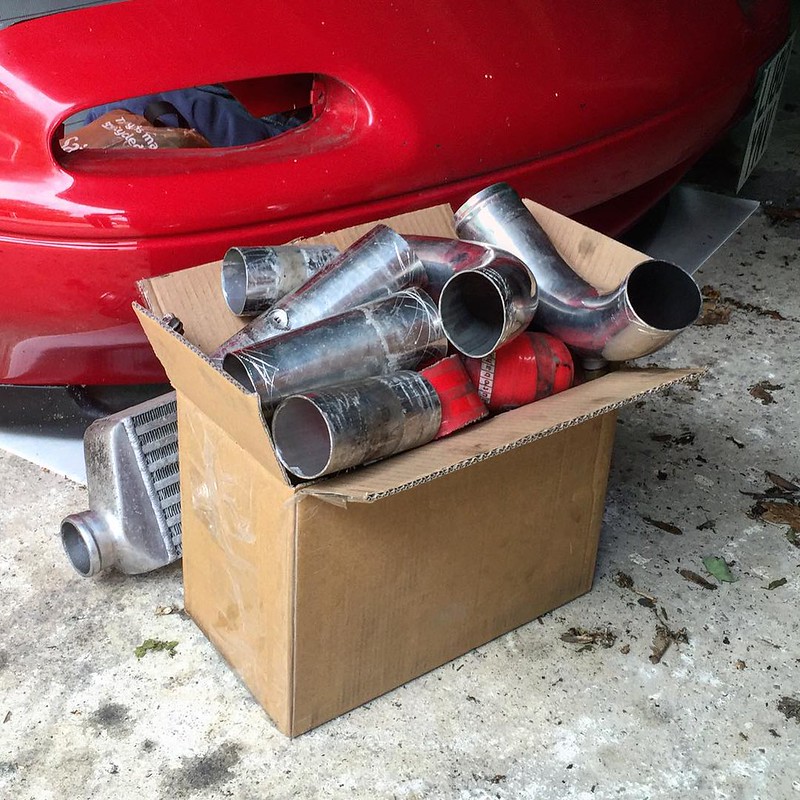
4. Remove your existing intercooler/crossover pipe setup. For me, it was many many short lengths of alloy pipe and silicone joiners. Chuck these to one side. Bung some paper towel or old rags in the throttle body and supercharger outlet - metal shavings will be flying around and you don't want these in your engine!
5. Think about where you want to position the intercooler. For me, I wanted to retain the bonnet catch, trim as little as possible from the car, and fit my 2.25" pipework under the bonnet without trimming that. So my intercooler was to be placed in the centre of the car, with the centre of the intercooler just behind the cross support, requiring my radiator to be spaced back about 1".
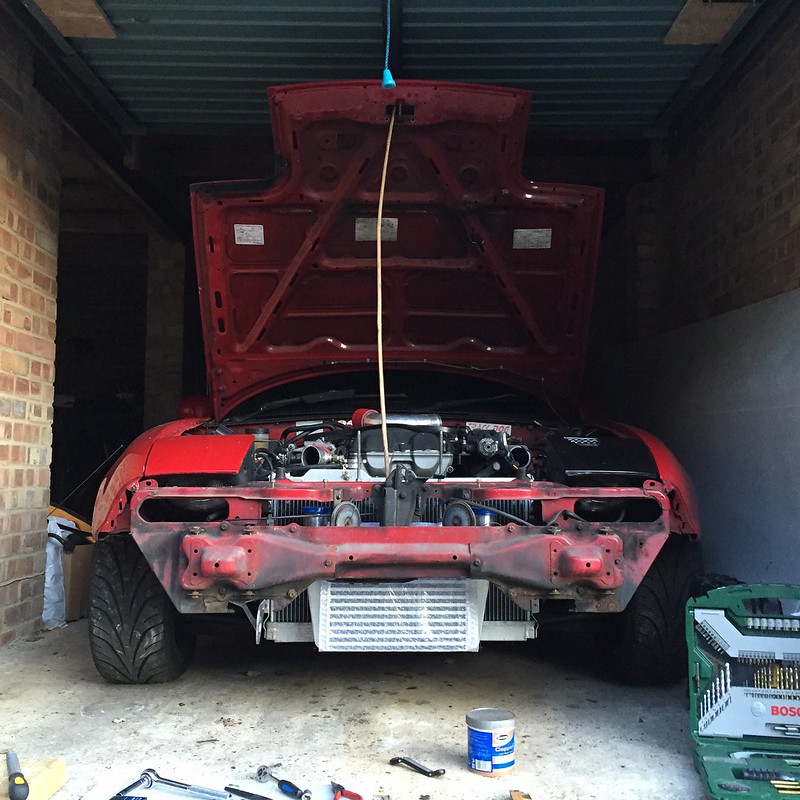
6. Remove the fan from the radiator, tie a strap around the radiator and the cross support, and remove the side mounts, leaving the radiator hanging in place. Note: with the Fast5 radiator, the mounts are fixed to the side of the radiator with two little 8mm screws, then two 12mm bolts hold those to the chassis, with the bottom located using pins sitting in cups (for want of a better description!).
7. To lower the radiator, the pins need to be moved up the mounts. Remove the tiny circlip securing the pin, and keep safe to one side. On the mounts, drill a 6mm hole as high up the mount as possible. Measure the distance, measure it again, and do exactly the same on the other side. Replace the pins and circlips, and screw the mounts back on to the radiator. The pins should now be floating above the cups.
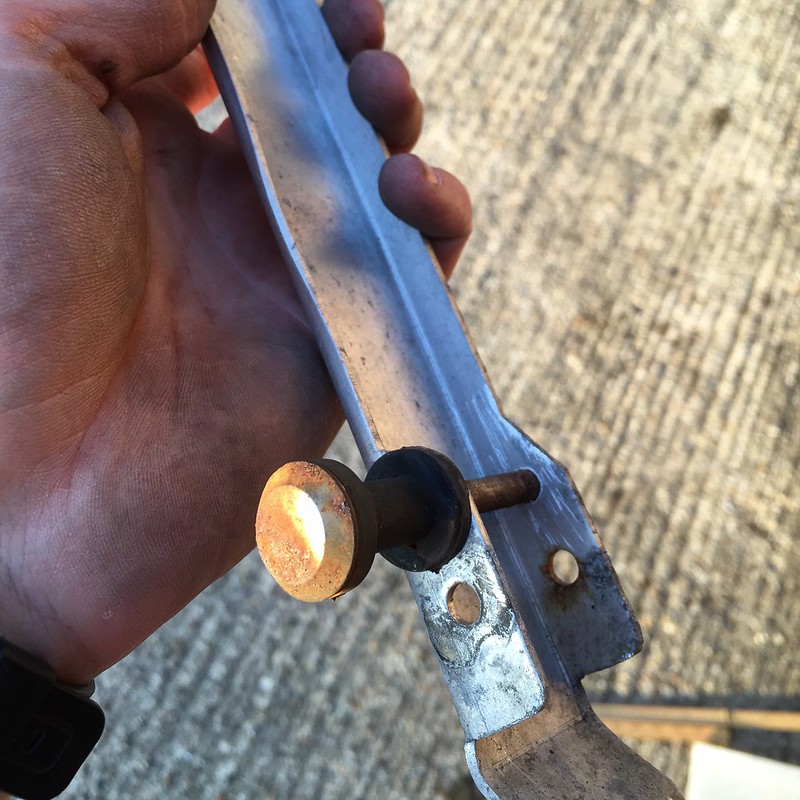
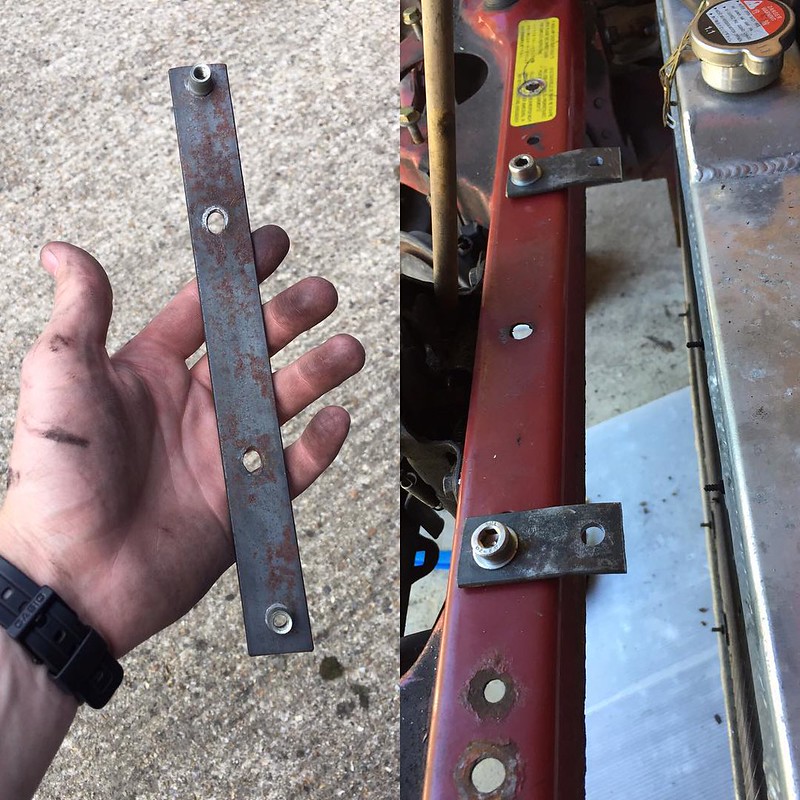
8. Now, to space it back, you'll need some spacers! I noticed that there were extra short straps holding the horns on, so removed those. They handily had a captive in one end and a hole in the other, so I carefully bent them in to a U-shape using a rubber mallet. I removed the strap holding the rad, and dropped the pins in to their cups. Then, leaning the rad back, I dropped in my amazing spacers, using the spare bolt from the horn to secure the spacer to the chassis, and the existing rad fixing bolt to secure the rad mount to the spacer, with it's handy captive. I now had a good amount of space in which to put the intercooler.
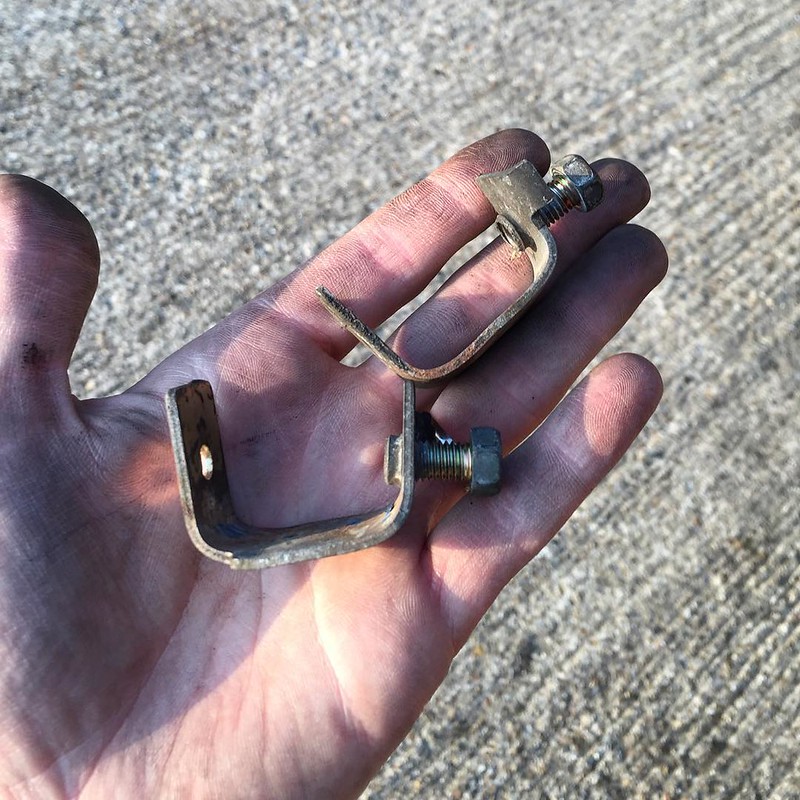
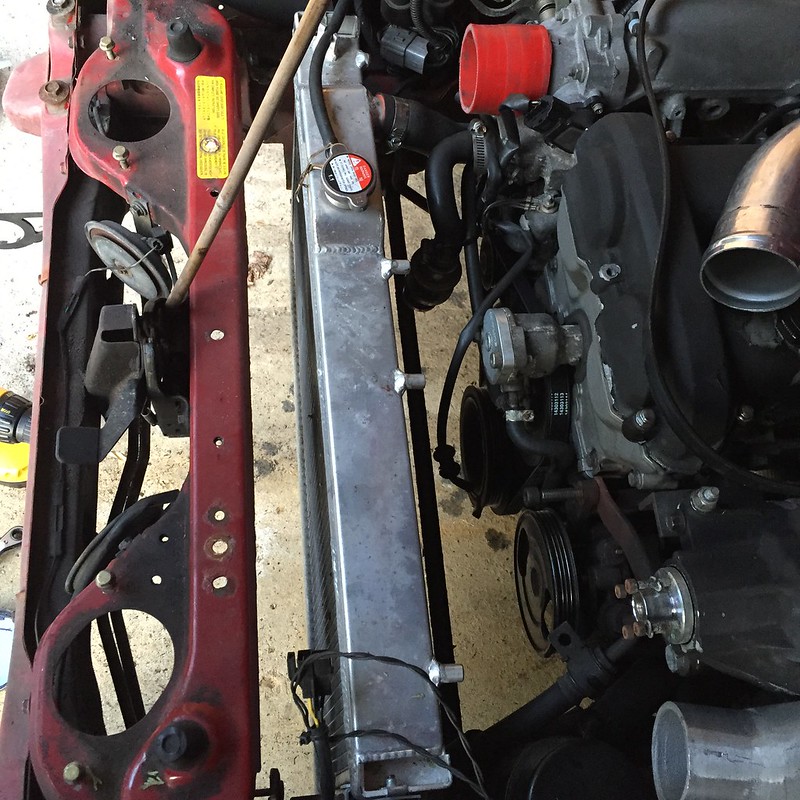
9. You'll be lifting the intercooler in from the bottom, as that's the easiest way to get it in there. Pop two lengths of M8 in the top of the intercooler to see where you need to put the holes/mounts. Mine came to just behind the cross support, so needed a nifty solution to help it hang. There was a strap of steel on the back of the old fan, so I used that - chopped two short lengths, drilled the extra holes, job done. the end that sits on the threaded bar has two nuts either side to grab it, for the cross support I inserted two rivnuts - this just makes everything easier but isn't essential.
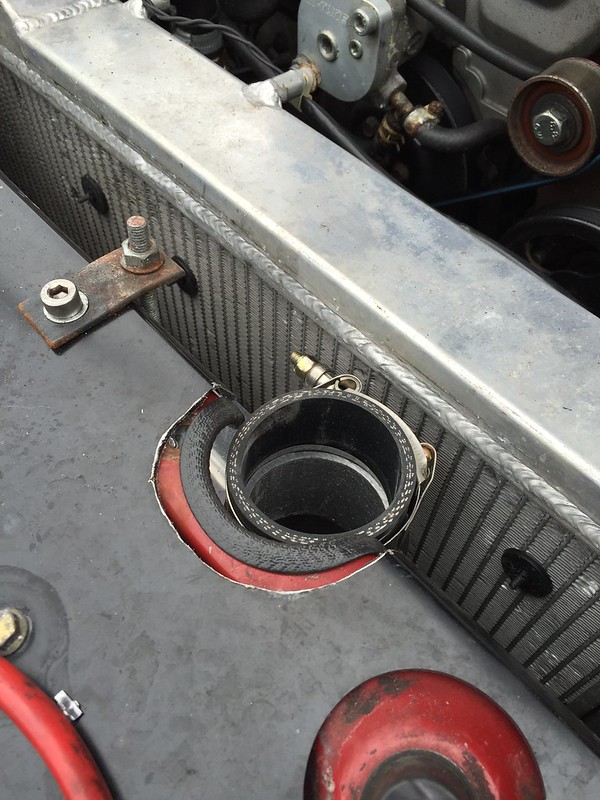
10. Once you're happy with the position of the intercooler, you'll notice that the outlets sit under the cross support. Mark the area you need to cut out, and then make the area a little bit larger than you think - don't forget that you need to add the silicone and clamps to the outlet which makes it considerably bigger. Once you're happy with what you need to cut out, remove the intercooler. Swarf will go everywhere.
11. Take a deep breath - this is the point of no return. Turn back now, or forever live with your actions. Now, having a Dremel at this point is useful. I however did not have one to hand, so using my trusty screw gun I drilled holes around the circumference of the area I had marked out. I then used a junior hacksaw blade to work my way around the holes, and then finished it off with a spot of filing. It's not the neatest in the world but it does the job! You'll probably want to paint where you cut so it doesn't start going rusty. Trim it with some rubber edging to hide your sins.
12. Before you crack on with the pipework, fit the slimline fans to the radiator using your preferred method. I started with the plastic ties that go through the fins, ended up with a shroud (which now fouls the ARB, so I'll have to move the rad again!). Wiring is fairly straightforward if you crimp the wires to the old connector. The fans I've had have had a blue wire and a black wire - black to black makes the fans spin the right way, I found. It's easy enough to check and swap if not.
13. Position the intercooler back in the place where you decided to put it. Now it's time to cut some pipework! Check the clearance with the bonnet regularly!
14. Starting with the easy side, the hot side, as it's pretty much a nice straight run, mark on your pipework where you need to make the cuts, and do so. I used a hacksaw, a band saw would be better. Remember to clean up your cuts with a file, and clean any swarf from the inside of the pipe.
15. The cold side is less easy if, like me, you have a rad cap to negotiate. A straight run was not possible on mine if I wanted to keep my ready welded IAT bung, so I used three bends, which took a lot of juggling to get right as it had to also clear the bonnet. I finally found the right combination after many cuts, trims, swears and tears. While I waited to get it welded, I used lots of leftover joiners and clamps and it looked hideous, but worked. Fit is all up to the engine, and tighten up the clamps. It can be a bit of a juggle to get it all on but fortunately silicone is very flexible!
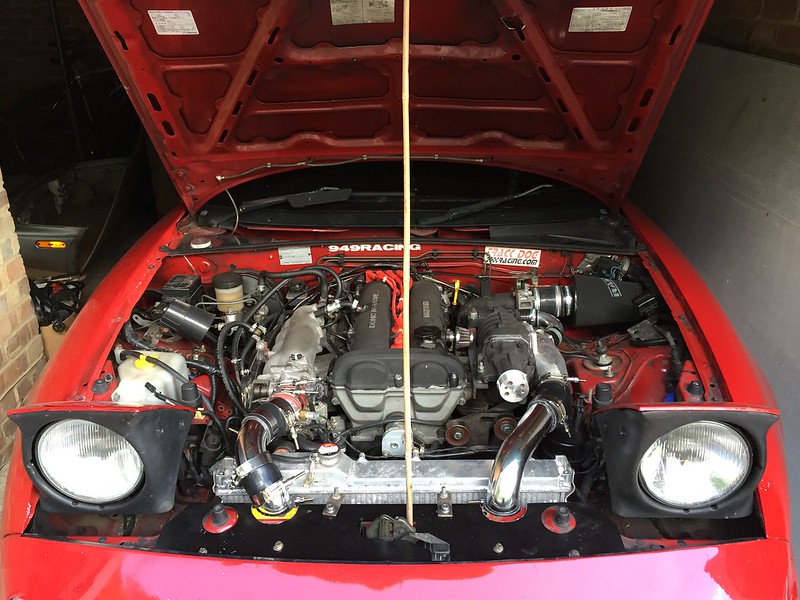
16. So now you have pipes, an intercooler, and all that's left is to put the bits you took off, back on! Start with the undertray and bumper support (do you remember which way up it goes?), then slot the bumper back on. Replace all the bolts you took off, then wonder where the leftovers go!
17. Fire up the car, check for leaks, tighten the clamps for luck, and check back in a few days as they do stretch/loosen a little over time. And that's you done.
Just to add, as it wasn't finished there...
I booked myself in to Skuzzle for the welding and a remap. The welding was fairly straight forward as the bends were already cut. Nick also welded in a couple of sections with beads so that it sealed even better. No leaks here!
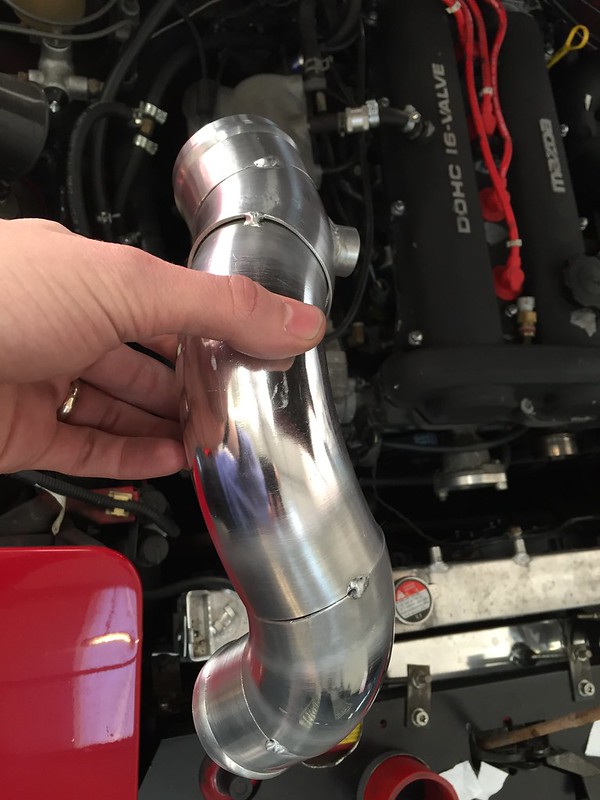
So - the finished article:
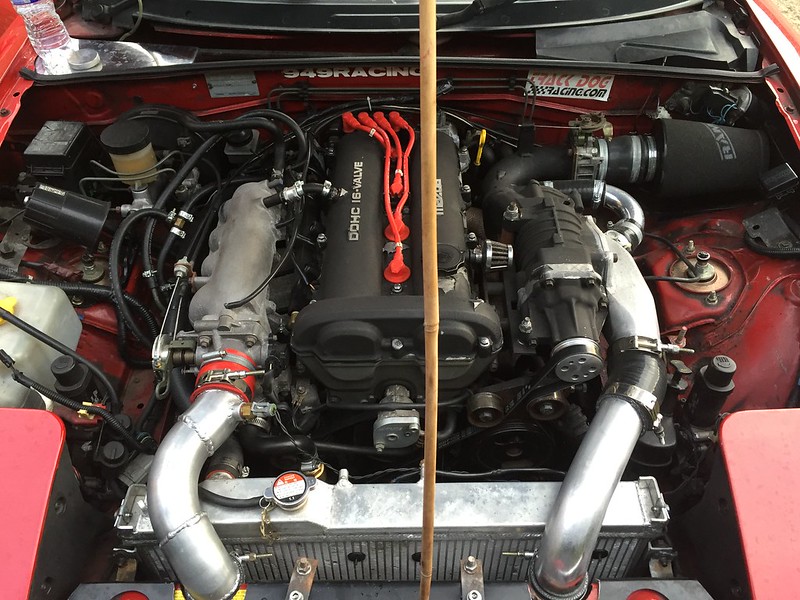
Ideally this would be finished off with better shrouding for the radiator and intercooler, but that's for another day when I am in the mood for cardboard-aided-design!
An over-the-radiator intercooler is ideal for supercharged cars - they require as little throttled volume as possible, especially those with a single throttle body, to give you good throttle response. It's less important on a turbo, but can't hurt. Another advantage is that you can reduce the number of clamps you use down to 8, which reduces the potential leak points massively. It also looks excellent.
There aren't many off-the-shelf kits out there - in fact, I think it's just Track Dog Racing that do one, and that's over $1000 before shipping, VAT and import duty. Ugh. So considering many people had done it before me, I wondered - how hard can it be? As it turns out, it's doable, but it's not easy.
You will need:
1. An intercooler with outlets on the top. I used a Toyosports off eBay (like this one).
2. Pipework. Decide what diameter pipework you want to use. I used 2.25" but 2" is plenty and gives you more room under the bonnet. It is entirely possible to use 2.25" without trimming the bonnet, but anything larger may need a spot of Dremel action. For the hot side, I used a long-legged (600mm) 90 degree bend. The cold side needed 3 90 degree bends to negotiate the rad cap - on the Fast5 rad, this is raised and going straight over it without drastically lowering the rad means it would foul the bonnet. It also meant I could re-use a bend I already had with the IAT sensor bung welded in, saving me money!
3. Reducers (x4) and appropriately sized clamps (x8). Reuse existing ones if you like. Jubilee clips are fine and probably better than Mikalor clamps anyway.
4. 8mm threaded rod, M8 nuts and some 2mm steel strap (about 30cm is plenty, but I reused bits I found on the car).
5. Slimline fans. Because you'll be lowering the rad and leaning it back, you'll need slimline fans so they don't foul the ARB.
6. Tools. A hand drill with assorted bits, a hammer (!), a Dremel would be useful but not necessary, and selection of the usual tools (sockets, spanners, etc.).
Total cost for parts for me was around £200 (excluding tools). If you need to have someone do some of the work, e.g. welding,for you then that will obviously be extra. I used Nick @ Skuzzle for the welds, but made the chops myself to get it roughly in the right place for him.
So. First up, get the car in comfortable place to work on. It's going to take a little while! You don't need to jack it up but it does make a few bits easier to do. It's likely to take a couple of days so park the car somewhere you can leave it in bits. This is probably not a do-on-the-street job!
Right, let's get started...
1. Open the bonnet, suck some air through your teeth, sip your tea, and confirm with yourself that you're happy to start chopping up your car. If you're unsure, please consult a specialist like Skuzzle.
2. Remove the sidelights, then the bumper. Depending on how many bolts you've lost over the years, it could be many to undo, it could be few. Pretty much all you need is a 10mm socket/spanner. This also means dropping the undertray. Don't forget the little support struts in the wheel arch.

3. Remove the bumper support plastic lump thing. 8x14mm bolts hold this one. Put the bolts back in the holes for safe keeping. Top tip: mark which side of the support is the top!
4. Remove your existing intercooler/crossover pipe setup. For me, it was many many short lengths of alloy pipe and silicone joiners. Chuck these to one side. Bung some paper towel or old rags in the throttle body and supercharger outlet - metal shavings will be flying around and you don't want these in your engine!

5. Think about where you want to position the intercooler. For me, I wanted to retain the bonnet catch, trim as little as possible from the car, and fit my 2.25" pipework under the bonnet without trimming that. So my intercooler was to be placed in the centre of the car, with the centre of the intercooler just behind the cross support, requiring my radiator to be spaced back about 1".

6. Remove the fan from the radiator, tie a strap around the radiator and the cross support, and remove the side mounts, leaving the radiator hanging in place. Note: with the Fast5 radiator, the mounts are fixed to the side of the radiator with two little 8mm screws, then two 12mm bolts hold those to the chassis, with the bottom located using pins sitting in cups (for want of a better description!).
7. To lower the radiator, the pins need to be moved up the mounts. Remove the tiny circlip securing the pin, and keep safe to one side. On the mounts, drill a 6mm hole as high up the mount as possible. Measure the distance, measure it again, and do exactly the same on the other side. Replace the pins and circlips, and screw the mounts back on to the radiator. The pins should now be floating above the cups.

8. Now, to space it back, you'll need some spacers! I noticed that there were extra short straps holding the horns on, so removed those. They handily had a captive in one end and a hole in the other, so I carefully bent them in to a U-shape using a rubber mallet. I removed the strap holding the rad, and dropped the pins in to their cups. Then, leaning the rad back, I dropped in my amazing spacers, using the spare bolt from the horn to secure the spacer to the chassis, and the existing rad fixing bolt to secure the rad mount to the spacer, with it's handy captive. I now had a good amount of space in which to put the intercooler.


9. You'll be lifting the intercooler in from the bottom, as that's the easiest way to get it in there. Pop two lengths of M8 in the top of the intercooler to see where you need to put the holes/mounts. Mine came to just behind the cross support, so needed a nifty solution to help it hang. There was a strap of steel on the back of the old fan, so I used that - chopped two short lengths, drilled the extra holes, job done. the end that sits on the threaded bar has two nuts either side to grab it, for the cross support I inserted two rivnuts - this just makes everything easier but isn't essential.

10. Once you're happy with the position of the intercooler, you'll notice that the outlets sit under the cross support. Mark the area you need to cut out, and then make the area a little bit larger than you think - don't forget that you need to add the silicone and clamps to the outlet which makes it considerably bigger. Once you're happy with what you need to cut out, remove the intercooler. Swarf will go everywhere.
11. Take a deep breath - this is the point of no return. Turn back now, or forever live with your actions. Now, having a Dremel at this point is useful. I however did not have one to hand, so using my trusty screw gun I drilled holes around the circumference of the area I had marked out. I then used a junior hacksaw blade to work my way around the holes, and then finished it off with a spot of filing. It's not the neatest in the world but it does the job! You'll probably want to paint where you cut so it doesn't start going rusty. Trim it with some rubber edging to hide your sins.

12. Before you crack on with the pipework, fit the slimline fans to the radiator using your preferred method. I started with the plastic ties that go through the fins, ended up with a shroud (which now fouls the ARB, so I'll have to move the rad again!). Wiring is fairly straightforward if you crimp the wires to the old connector. The fans I've had have had a blue wire and a black wire - black to black makes the fans spin the right way, I found. It's easy enough to check and swap if not.
13. Position the intercooler back in the place where you decided to put it. Now it's time to cut some pipework! Check the clearance with the bonnet regularly!
14. Starting with the easy side, the hot side, as it's pretty much a nice straight run, mark on your pipework where you need to make the cuts, and do so. I used a hacksaw, a band saw would be better. Remember to clean up your cuts with a file, and clean any swarf from the inside of the pipe.
15. The cold side is less easy if, like me, you have a rad cap to negotiate. A straight run was not possible on mine if I wanted to keep my ready welded IAT bung, so I used three bends, which took a lot of juggling to get right as it had to also clear the bonnet. I finally found the right combination after many cuts, trims, swears and tears. While I waited to get it welded, I used lots of leftover joiners and clamps and it looked hideous, but worked. Fit is all up to the engine, and tighten up the clamps. It can be a bit of a juggle to get it all on but fortunately silicone is very flexible!

16. So now you have pipes, an intercooler, and all that's left is to put the bits you took off, back on! Start with the undertray and bumper support (do you remember which way up it goes?), then slot the bumper back on. Replace all the bolts you took off, then wonder where the leftovers go!
17. Fire up the car, check for leaks, tighten the clamps for luck, and check back in a few days as they do stretch/loosen a little over time. And that's you done.
Just to add, as it wasn't finished there...
I booked myself in to Skuzzle for the welding and a remap. The welding was fairly straight forward as the bends were already cut. Nick also welded in a couple of sections with beads so that it sealed even better. No leaks here!

So - the finished article:

Ideally this would be finished off with better shrouding for the radiator and intercooler, but that's for another day when I am in the mood for cardboard-aided-design!


 le sigh