|
|
Post by scottydugg on Aug 28, 2018 8:16:15 GMT
I did see your wheels and suspension up for sale and wondered what was going on  Have a look at Gingium on youtube if you haven't already. He has a lifted 5 you'd probably be interested in. |
|
|
|
Post by Bilbo on Aug 28, 2018 9:40:25 GMT
I did see your wheels and suspension up for sale and wondered what was going on  Have a look at Gingium on youtube if you haven't already. He has a lifted 5 you'd probably be interested in. His is total madness! You see how much sill he cut away?  It's so cool but I'm not going that extreme, I just need more height! |
|
|
|
Post by Bilbo on Sept 2, 2018 17:24:35 GMT
Right so I've done a bit more work on it. I need a bit more lift but wasn't sure on the Paco lift kit as with the mk2 shocks I feel it would have been so high and I'm not sure that the driveshafts would like being at such a crazy angle for long. I was looking at 10mm top mount spacers from Jass, and a mate said he'd make them for me. As a guide I got him to just use one of the top mount gaskets. He cut them out of 10mm steel at his workshop at work, and even sprayed them for me. Didn't even charge, what a total legend. Saved me £80. Here they are:  IMG_20180829_214258_903 IMG_20180829_214258_903 IMG_20180829_214258_897 IMG_20180829_214258_897So I got the car in the air and removed the rear shocks again, no dramas. slotted the spacers on, perfect fit:  IMG_20180901_175312 IMG_20180901_175312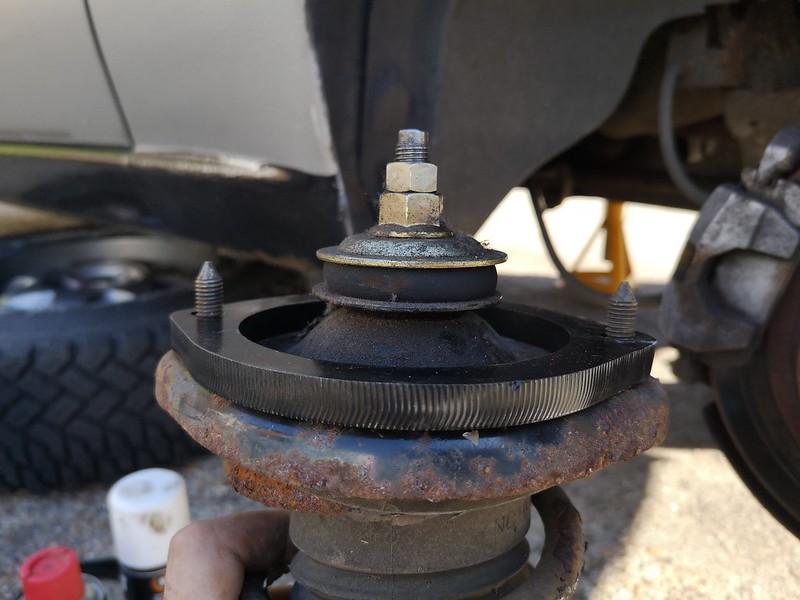 IMG_20180901_171902 IMG_20180901_171902These leave just enough thread to do the top nuts up, 10mm is the absolute max for these. Note that if you have early mk1 shocks the studs are shorter and you cannot safely use these in 10mm size. Now I was reading into lift kits and came across a miata.net thread. One user suggested that a spacer of 10mm on the top mount will equate to more actual height increase than 10mm, which I thought was a little odd. However they were very much correct! 1cm spacer has taken my rear ground clearance from 7 1/2 inches up to 8 3/4 inches when I measured. Literally nothing else has been changed apart from the spacers. Looks a lot better with the extra clearance too (note only rear spacers added at the moment):  IMG_20180901_183114 IMG_20180901_183114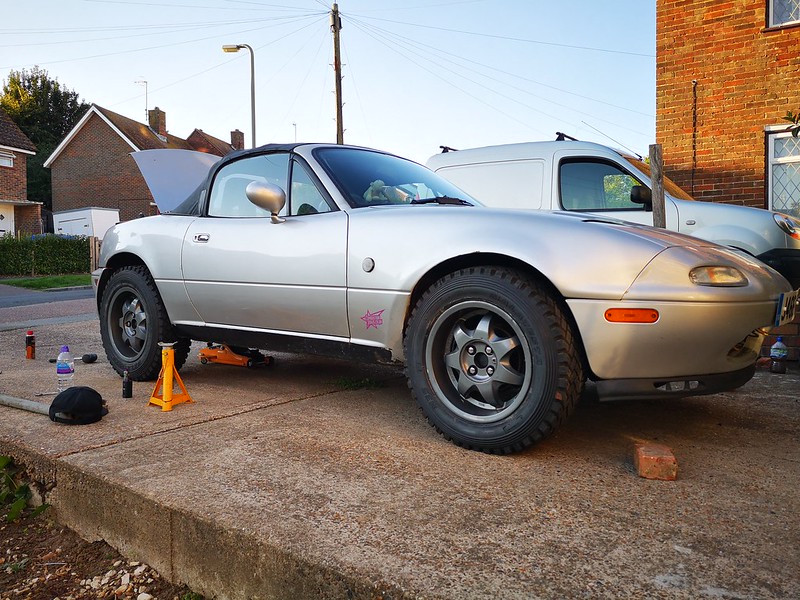 IMG_20180901_182310 IMG_20180901_182310 IMG_20180901_184432 IMG_20180901_184432 IMG_20180901_214916 IMG_20180901_214916 IMG_20180901_214905 IMG_20180901_214905Starting to take shape. I was having some quite bad rub on the front when turning. I had a look and it was the upper bumper support causing this. So I've cut away more of the front bumper, and bent the bumper support tab out of the way. No clearance issues at all when turning now. Rears still need a little more grinding away, and then I'll weld them up properly. Just catching the arch lip slightly when there's a lot of suspension compression. Also after a long drive today it still drives well, can be a bit more wallowy at speed on uneven ground, but feels planted when flat out, and still handles corners like a 5 (albeit with a bit more body roll). Well happy overall, can't wait to get final clearance issues sorted and go find some lanes to blast down. |
|
|
|
Post by wannabe on Sept 2, 2018 20:32:10 GMT
You are going to RULE when the snow comes  |
|
|
|
Post by Bilbo on Sept 3, 2018 0:52:05 GMT
You are going to RULE when the snow comes  We shall see! Not driven in the wet yet. In the dry the tyres are loud but seem to handle the road very well. Had to do an emergency brake as some bell pulled out on me on a roundabout, tyres gripped up well and kept me out of his driver door. |
|
|
|
Post by Bilbo on Sept 5, 2018 12:27:30 GMT
So my front wings are just totally shot on the lower portion, pretty standard. Due to this I didn't really take much care of them when "massaging" them with a mallet for clearance on the new tyres.  Not pretty. So I'm thinking of cutting them down, just completely removing the lower portion. This will get rid of the rusty wing situation and I will have a ton more clearance for my chunkyboi tyres. Thinking of something along these lines (left, also not my photo, found it here: forum.retro-rides.org/thread/85374/cutaway-arches): Now in terms of "the law", I'm thinking as long as top of tread is within the arch and there are no sharp edges this is perfectly legal, can't see any reason why it wouldn't be. Thoughts? |
|
|
|
Post by wannabe on Sept 5, 2018 14:12:24 GMT
I think I agree with your thinking - Caterhams effectively have an even more 'open' arrangement, so should be fine?
I wonder about spray being thrown up during rain and puddles, though - with no arch liner, will it just mean quicker death-by-rust? If not death-by-blindness-by-spray?
|
|
|
|
Post by Bilbo on Sept 5, 2018 14:23:29 GMT
I think I agree with your thinking - Caterhams effectively have an even more 'open' arrangement, so should be fine? I wonder about spray being thrown up during rain and puddles, though - with no arch liner, will it just mean quicker death-by-rust? If not death-by-blindness-by-spray? Haven't had arch liners for almost a year haha. They trap so much crap too! Think I might just do it and just Dinitrol everything in the area. |
|
|
|
Post by Bilbo on Sept 14, 2018 23:40:57 GMT
Decided I wanted to remove the front lip as it doesn't really suit the lifted look. Makes it look a bit higher without which is cool.  IMG_20180914_135644 IMG_20180914_135644Also decided the rear bumper needed cutting down as it was just looking a bit too standard, and I think the lift really lends itself to a more cut down look when it comes to bumpers. So to keep things symmetrical I decided to use the left side exhaust cut out that Flyin Miata conveniently have available on their site: www.flyinmiata.com/support/instructions/intake_exhaust/FM_dual_template_M1.pdfDid some very amateur measuring without a tape measure, but it came out alright: 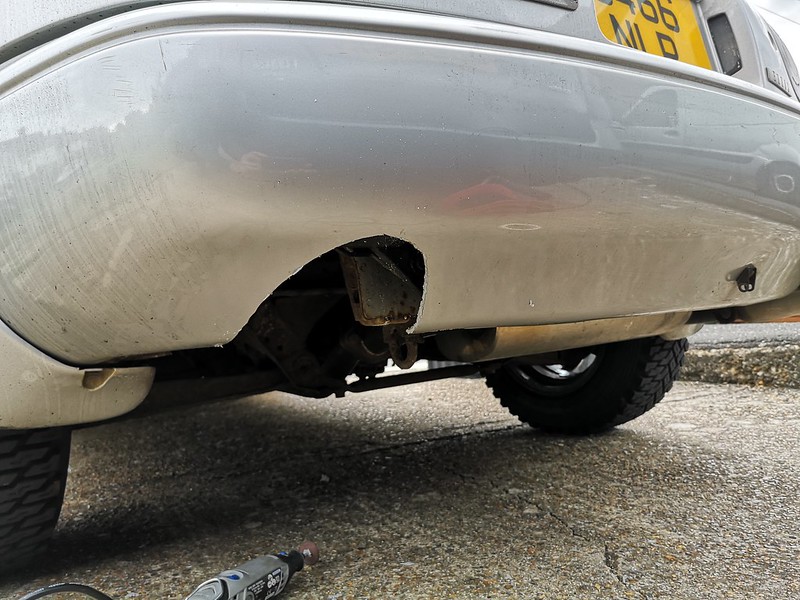 IMG_20180914_153817 IMG_20180914_153817Then I put a line of masking tape between the top of the two cuts and cut all the way along. Dremel went through it easy, but also needed to cut down the lower bumper support plastic as it was no longer needed and didn't quite look right. I got angry with this as the plastic is thicker and after breaking a Dremel disc on full power and having a narrow escape with it almost hitting my eye, I went inside and got the goggles and the trusty grinder. Fiddly work and melted liquid plastic on your finger is no fun at all. However, worth the effort, still needs some finishing but came out pretty good I think! 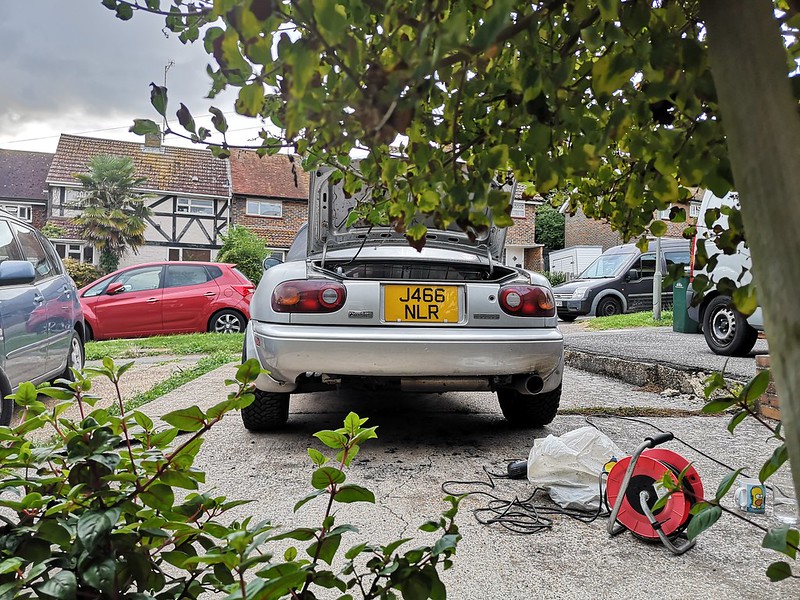 IMG_20180914_180020 IMG_20180914_180020Gave the exhaust a quick wipe down and it came up nice and shiny 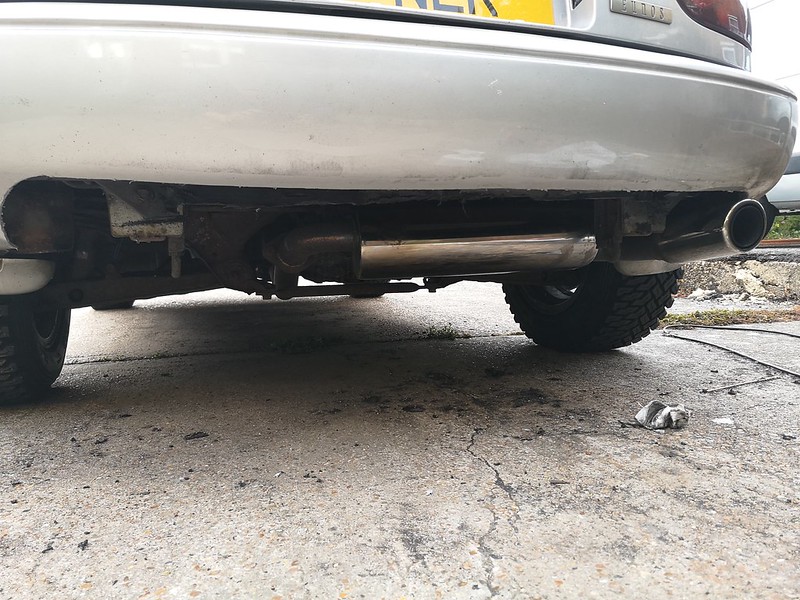 received_272462290052267 received_272462290052267Met a mate earlier this week and took a few photos. Many laughs were had at the height, and it seems to get a lot of attention from people, mainly just total confusion at what the hell I've done, but overall positive so far. 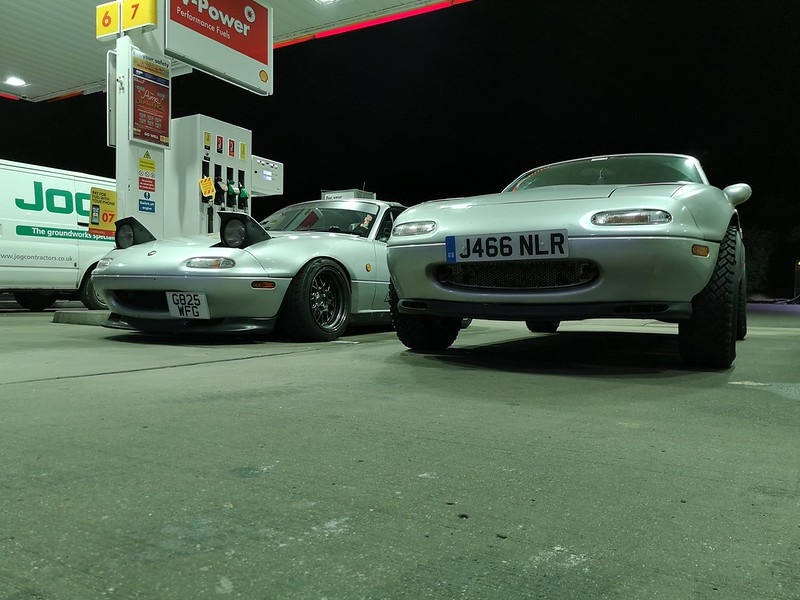 IMG_20180906_204530 IMG_20180906_204530 received_1877328315654577 received_1877328315654577 received_2700831640141380 received_2700831640141380Next couple of weeks I'll need to do a bit more grinding on the arches, and then on to welding practice to get the lips welded up, and then I need to do the sill before winter kicks it's ass. |
|
|
|
Post by wannabe on Sept 14, 2018 23:49:32 GMT
Awesome  I can't remember if you've done the foglight relocation thing? That other 5 must be a complete PITA on anything but smooth dual carriageways, what with being so low! |
|
|
|
Post by Bilbo on Sept 15, 2018 0:43:04 GMT
Awesome  I can't remember if you've done the foglight relocation thing? That other 5 must be a complete PITA on anything but smooth dual carriageways, what with being so low! Yeah I have, but my crimp was so poor that it fell apart so need to attach it again haha. His car is low but it's not too bad, I think it looks worse than it is, but yeah speed bumps aren't great fun for him. |
|
|
|
Post by Bilbo on Oct 7, 2018 19:17:19 GMT
Rusty front wings!  IMG_20181007_131512 IMG_20181007_131512Took bottom bolts out, well snapped two actually. Lots of stuff fell out, grim.  received_2386954977997615 received_2386954977997615Boo! Me no like, angle grinder time.  received_300060373926390 received_300060373926390 IMG_20181007_144937 IMG_20181007_144937Bit of rust lurking behind there, but all solid really. Grinded back and wire brushed, then painted some Hydrate80 rust converter on 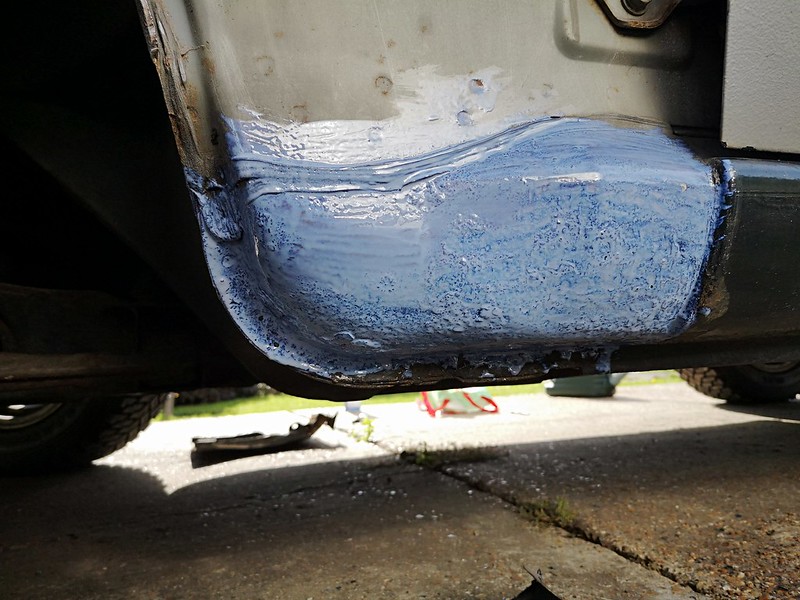 IMG_20181007_140911 IMG_20181007_140911 received_462754240901600 received_462754240901600Really good stuff! Half hour later  IMG_20181007_141031 IMG_20181007_141031Looking much better already! So I cracked out the Dinitrol 4941 aerosol (also amazing stuff, coats really well and no drips!)  IMG_20181007_142750 IMG_20181007_142750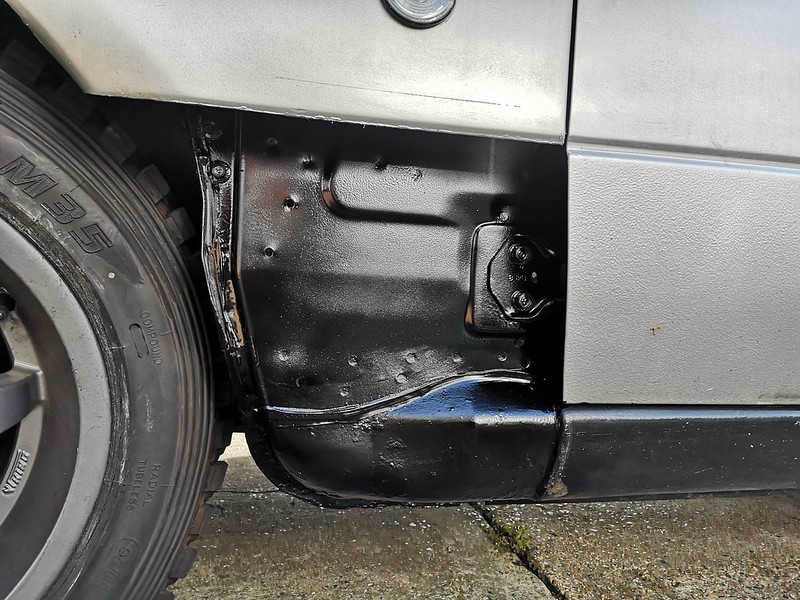 IMG_20181007_144948 IMG_20181007_144948fixed 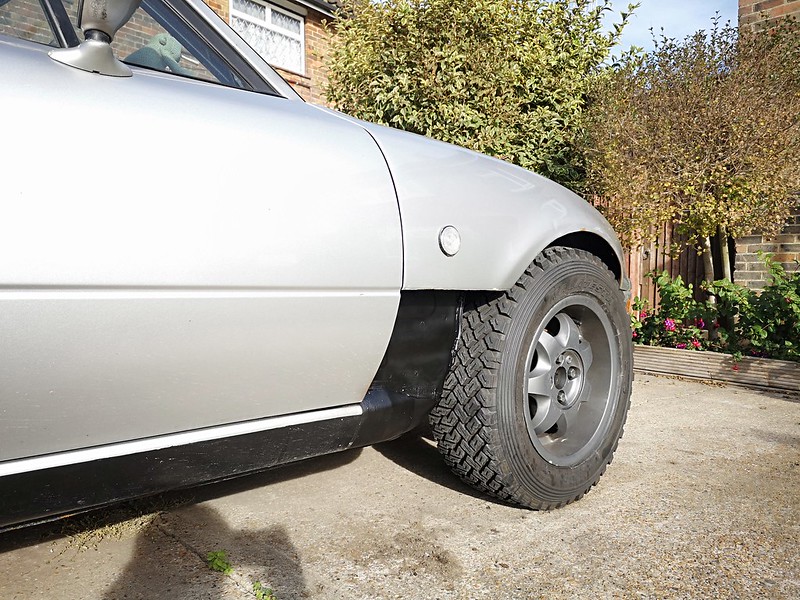 IMG_20181007_154045 IMG_20181007_154045Carrying on with the cut down look. I quite like it, adds to the lifted look, and after the front bumper cut I've decided I'm going to do I think it will tie in well all together. Then a ducktail rear spoiler to top it off, and paint a few more bits maybe. Wideband sensor has unfortunately died I think. Annoying, gauge only shows min or max readings, maybe a loose connection, but on initial inspection nothing is loose. So that's another around £70 I could do without right now. Oh well, such is life with cars. Will check it over properly next weekend. On another note I went to this small cars and coffee thing with a mate, just outside Worthing. Not much turned up but there were a few awesome American cars, Charger, GMC truck, Mustangs, Corvette. Then this rocked up:  IMG_20181006_110113 IMG_20181006_110113 IMG_20181006_115041 IMG_20181006_115041 IMG_20181006_115250 IMG_20181006_115250 IMG_20181006_115225 IMG_20181006_115225It's my dad's mate's old car. I remember seeing it at like 8 years old and not really appreciating how mad it was. Ford Capri 3.0S, but with a 4.0 Rover engine, and blower. Since my dad's mate sold it 15 years ago it's still knocking about, only it is now twin supercharged! Blower is higher than the roof line. Also has other awesome stuff like drag rear wheels, tubbed rear arches, full cage and bucket seats, line lock, 9" Ford Torino diff, nitrous system, and more gauges than any sane person would want! Incredible! |
|
|
|
Post by wannabe on Oct 7, 2018 20:41:36 GMT
That Capri is awesome lol Thanks for the picture guide as well!  I need to get me some of that Hydrate80 and Dinitrol stuff for my boot floor before it falls out... lol Do you literally just spray over the top of the hydrate80 when it's dried? Is the Dinitrol stuff a sort of anti-stonechip solution and sealant in one?? |
|
|
|
Post by Bilbo on Oct 8, 2018 11:52:21 GMT
That Capri is awesome lol Thanks for the picture guide as well!  I need to get me some of that Hydrate80 and Dinitrol stuff for my boot floor before it falls out... lol Do you literally just spray over the top of the hydrate80 when it's dried? Is the Dinitrol stuff a sort of anti-stonechip solution and sealant in one?? It was mad, sounded incredible too. It's done an 11.02 pass at Pod as well so no slouch. No worries, both really good stuff! That's what I did yeah, they said to do 2 coats of Hydrate80 painted at a 90 degree angle to the first, but mine didn't really need it to be honest so just did 1. It also said to leave it 24 hours but ain't nobody got time for that. I think it's both yeah, it says it is a waxy layer, though it feels to have dried quite nicely to the touch unlike some other underseals. Either way it's so easy to apply, not the cheapest cans ever, but literally no mess, just masked and sprayed on after cleaning the area and didn't have one drip, and I laid it down thick as well. Just don't get it on your hands, total bitch to get off haha. |
|
|
|
Post by wannabe on Oct 8, 2018 12:05:54 GMT
No worries, both really good stuff! That's what I did yeah, they said to do 2 coats of Hydrate80 painted at a 90 degree angle to the first, but mine didn't really need it to be honest so just did 1. It also said to leave it 24 hours but ain't nobody got time for that. I think it's both yeah, it says it is a waxy layer, though it feels to have dried quite nicely to the touch unlike some other underseals. Either way it's so easy to apply, not the cheapest cans ever, but literally no mess, just masked and sprayed on after cleaning the area and didn't have one drip, and I laid it down thick as well. Just don't get it on your hands, total bitch to get off haha. My boot floor is pretty much a sheet of rust lol, so I will have to do plenty of coats!! I assume one can just spraypaint over the Hydrate 80 and then Dinitrol over the top of that if required? Would it be weird to spray the whole car in Dinitrol?  LOL Thanks for the advice!  |
|